
Size
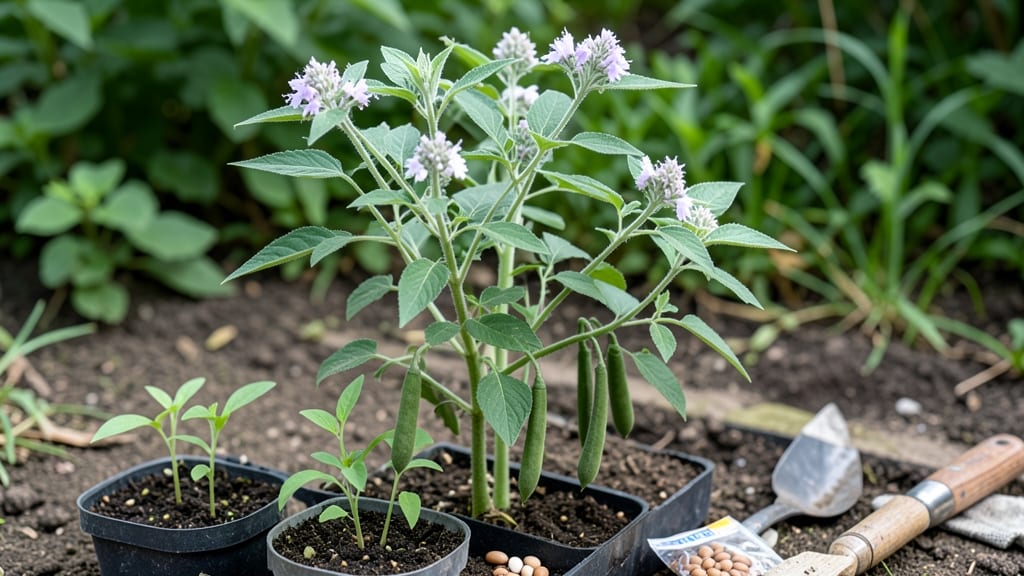
Growing sesame plants from seed unlocks a 60-day harvest of fragrant, nutrient-rich seeds—if you nail the soil, spacing, and timing. I learned the hard way that sesame thrives in warm, well-drained soil with consistent moisture, but too much water drowns those delicate seedlings.
The key? Planting after your last frost when soil hits 70°F, then watching them shoot up in just 2-3 weeks. Sesame seeds need full sun (6+ hours daily) and light, sandy soil to prevent rot.
Space plants 12-18 inches apart—crowding stresses them, while proper airflow keeps diseases at bay. Most beginners overwater; sesame plants wilt dramatically when thirsty but bounce back fast once soil dries slightly. A mulch layer helps retain moisture without suffocating roots.
By day 60, you’ll harvest golden pods that split open when ripe—each plant yields 1-2 tablespoons of seeds. The nutty aroma fills the air as you dry them, perfect for baking or cooking.
Sesame pairs well with sunflowers (they share pest deterrents) and beans (they fix nitrogen in the soil). For best results, start seeds indoors 4-6 weeks before transplanting—sesame hates cold soil. If your season’s short, opt for early-maturing varieties like ‘Black Sesame’ or ‘White Sesame’. The payoff?
Homegrown sesame tastes far richer than store-bought, with none of the preservatives.
📚 In This Guide
- What you need
- Instructions
- Tips and common mistakes
- Wrapping up and next steps
What you need
- ● Sesame Seeds: 1–2 lbs (organic, non-GMO preferred for best results). Look for varieties like Tif sesame or local heirloom seeds suited to your climate.
- ● Growing Containers or Garden Bed: Containers: 5–10 gallon pots (with drainage holes) or raised beds (minimum 12" deep).
- ● Garden Bed: Well-draining soil in a sunny spot (6+ hours of sunlight daily).
- ● High-Quality Soil: Lightweight, well-draining potting mix (or garden soil amended with compost). Avoid heavy clay.
- ● Fertilizer: Balanced Fertilizer: 10-10-10 or 5-10-10 (follow package rates).
- ● Organic Option: Compost or worm castings (mix 1–2 cups per planting hole).
- ● Watering Can or Hose: With a gentle spray nozzle to avoid disturbing seedlings.
- ● Plant Labels: Small stakes or markers to track varieties and planting dates.
- ● Mulch: Straw or shredded leaves to retain moisture and suppress weeds.
- ● Row Covers: Lightweight fabric to protect seedlings from pests or cold snaps.
- ● Pruning Shears: For trimming excess foliage (if needed).
- ● pH Test Kit: To ensure soil pH is between 6.0–7.0 (sesame prefers slightly acidic to neutral soil).
- ● Harvesting Gloves: For easy seed collection when plants mature.
Step-by-step guide to growing sesame plants
Sesame thrives with patience—here's how to coax those delicate plants from seed to harvest in just two months.
🌱 Step 1: Prepare the Soil and Plant Seeds
Sesame prefers well-draining soil with a pH between 6.0 and 7.5. Work 2 inches of compost into the top 6 inches of garden soil to improve fertility without compacting it. Sesame seeds germinate best in warm soil (70-85°F), so wait until nighttime temperatures stay above 60°F before planting. Scatter seeds ¼ inch deep, spacing them 12 inches apart in rows 18 inches apart. You'll want to plant 4 seeds per hill—this gives you backup seedlings if some fail to emerge.
Press the soil gently around each seed to ensure good seed-to-soil contact, but don't compact it. Sesame seeds are tiny, so I use a small piece of cardboard to mark each planting spot until seedlings appear. Water the area lightly after planting—just enough to moisten the soil without displacing the seeds. Overwatering here will cause seeds to rot before they sprout.
☀️ Step 2: Provide Warmth and Light for Germination
Sesame seedlings emerge in 7-14 days once soil temperatures reach 75°F. Until then, maintain consistent moisture by watering every 2-3 days—just enough to keep the top 1 inch of soil damp. You'll know it's time to water when the soil surface begins to dry out and pull away slightly from the edges of your planting rows.
Once seedlings appear, move them to a location with full sun (6+ hours daily). Sesame plants are sensitive to shade, and insufficient light leads to weak stems and poor seed production. If growing in containers, place them on a south-facing windowsill or under grow lights for 12-14 hours daily. You'll notice healthy seedlings develop deep green leaves and compact growth—a sign they're getting the right amount of light.
💧 Step 3: Maintain Moisture and Fertility Through Growth
Sesame plants are drought-tolerant once established, but they need consistent moisture during the first 4 weeks to develop strong roots. Water deeply once a week, aiming for 1 inch of water per week. You can check moisture by sticking your finger 1 inch into the soil—if it feels dry, it's time to water. Avoid wetting the leaves, as this can lead to fungal diseases. Water at the base of the plant in the early morning to allow foliage to dry quickly.
When plants reach 12 inches tall, apply a balanced fertilizer (10-10-10) at half-strength. Sesame plants don't need heavy feeding, but a light application of fertilizer encourages bushier growth and better seed production. Stop fertilizing once flowers appear—too much nitrogen at this stage will promote leafy growth at the expense of seed development. You'll see the first flowers appear 6-8 weeks after planting, signaling it's time to shift focus from watering to supporting the plants as they set seed.
✂️ Step 4: Support Plants and Harvest at Maturity
Sesame plants grow 2-3 feet tall and may need staking if grown in windy areas. Install sturdy stakes (3 feet tall) near the base of each plant and gently tie the stems with soft twine as they grow. This prevents lodging and ensures the plants stay upright for easy harvesting. You'll know the plants are ready for harvest when the leaves turn yellow and the seed pods begin to dry out, typically 90-100 days after planting.
To harvest, cut the entire plant at the base with clean pruners and hang it upside down in a dry, well-ventilated area for 2-3 weeks. This allows the pods to dry completely before threshing. Once the pods are brittle and the seeds rattle inside, rub the stems between your hands or use a flail thresher to separate the seeds. Store the seeds in an airtight container in a cool, dark place—they'll keep for up to 6 months if stored properly.
Tips & tricks for growing sesame plants successfully
Sesame plants reward patience with abundant harvests, but a few strategic adjustments can make all the difference between thriving plants and disappointing yields. Here's what I've learned from years of growing these delicate crops.
Soil Preparation Secret: The 2 inches of compost you work into the top 6 inches of soil should be thoroughly mixed to avoid pockets of high fertility. I've found that adding a handful of perlite to this mixture improves drainage even further, especially in heavier clay soils. Sesame roots are shallow but sensitive to waterlogging, so this extra step prevents rot before seeds even sprout. The pH test is crucial—if your soil tests below 6.0, amend with lime before planting, as sesame plants struggle to absorb nutrients in acidic conditions.
Germination Timing: Those 7-14 days of waiting for seedlings can feel endless, but consistency is key. I've noticed that using a soil thermometer to confirm temperatures between 70-85°F makes all the difference. If your soil stays below 75°F, consider using a seedling heat mat ($20 at garden centers) to jumpstart germination. The cardboard markers I use for planting spots aren't just helpful—they create microclimates that retain warmth around each seed, which can shave days off your germination time.
Light Management: The 6+ hours of full sun requirement is non-negotiable, but here's what I do to maximize light exposure: I plant sesame in the southernmost part of my garden where sunlight hits first. For container growers, I rotate pots every 2-3 days to ensure even light exposure on all sides. The deep green leaves and compact growth you're aiming for won't develop if plants stretch toward light—this is a clear sign they need more direct sunlight or taller neighbors removed.
Harvesting Readiness: The 90-100 day window to harvest is tight, so I've developed a simple test: When the first pods begin to dry and turn brown at the tips while the leaves are still mostly green, that's your cue. I harvest by cutting entire plants at the base rather than picking individual pods—this ensures all seeds mature uniformly. The 2-3 week drying period is critical; I've found that hanging plants in a garage with a small fan circulating air speeds up drying without risking moisture damage.
Pro Tips for Grow Sesame Seed Plant
- Sesame plants reward patience with abundant harvests, but a few strategic adjustments can make all the difference bet...
- Soil Preparation Secret: The 2 inches of compost you work into the top 6 inches of soil should be thoroughly mixed to...
- Germination Timing: Those 7-14 days of waiting for seedlings can feel endless, but consistency is key. I've noticed t...
Frequently asked questions
Got questions about growing sesame seeds? You’re not alone!
Here are some of the most common queries—and their easy, actionable answers—to help you succeed from seed to harvest.
How long does it take to grow sesame seeds from seed to harvest?
Sesame plants typically mature in 60–90 days, depending on the variety and climate. For faster results, opt for early-maturing varieties like Tif sesame, which can be ready in as little as 60 days with proper care. Warm weather (75–90°F) speeds up growth, so plant after the last frost in spring or summer.
Can I grow sesame seeds in cold climates?
Sesame thrives in warm weather and struggles in cold or frost. If you live in a cooler zone, try growing sesame in containers and move them indoors or to a greenhouse during chilly nights. Alternatively, plant in late spring or early summer when soil temps stay above 60°F. Some gardeners also use black plastic mulch to retain heat.
What’s the best way to thin sesame seedlings?
Thin seedlings to 6–12 inches apart once they’re 2–3 inches tall. Use scissors to snip unwanted plants at soil level (avoid pulling to prevent disturbing roots). Pro tip: Thin on a cloudy day to reduce stress on remaining plants. Overcrowding leads to weak stems and lower yields, so spacing is key!
Why are my sesame plants wilting or turning yellow?
Wilting or yellowing often signals underwatering, overwatering, or pests. Check soil moisture—sesame plants need 1–1.5 inches of water per week but hate soggy roots. Look for aphids or spider mites on leaves; blast them off with water or use neem oil. If leaves curl, it could also be heat stress—provide afternoon shade in extreme heat.
How do I know when sesame seeds are ready to harvest?
Harvest when 50% of pods turn yellow-brown and split open naturally. If left too long, seeds may shatter or attract pests. Cut stems with scissors, then dry pods in the sun for 3–5 days before threshing (rubbing to remove seeds). Store seeds in a cool, dry place for up to 6 months—or use them fresh in cooking!
Can I grow sesame indoors or in small spaces?
Yes! Sesame grows well in containers (5+ gallons) with full sun. Use a lightweight potting mix and fertilize lightly with compost. Place near a sunny window or under grow lights (12+ hours/day). Just ensure good airflow to prevent fungal issues. Bonus: Dwarf varieties like Sesamum indicum ‘White’ are perfect for small gardens!
Wrapping up and next steps
Growing your own sesame seed plant is a rewarding journey that yields nutrient-rich seeds in just 60 days! With the right soil, sunlight, and care, you’ll enjoy a bountiful harvest perfect for cooking, baking, or even selling.
Whether you’re a beginner or seasoned gardener, this quick-growing crop is a fantastic addition to your garden.
Ready to take the next step? Start small—try a few plants in pots or a small plot—and experiment with varieties. Soon, you’ll be savoring the crunch of homegrown sesame seeds in your favorite dishes! 🌱✨