
Propagation
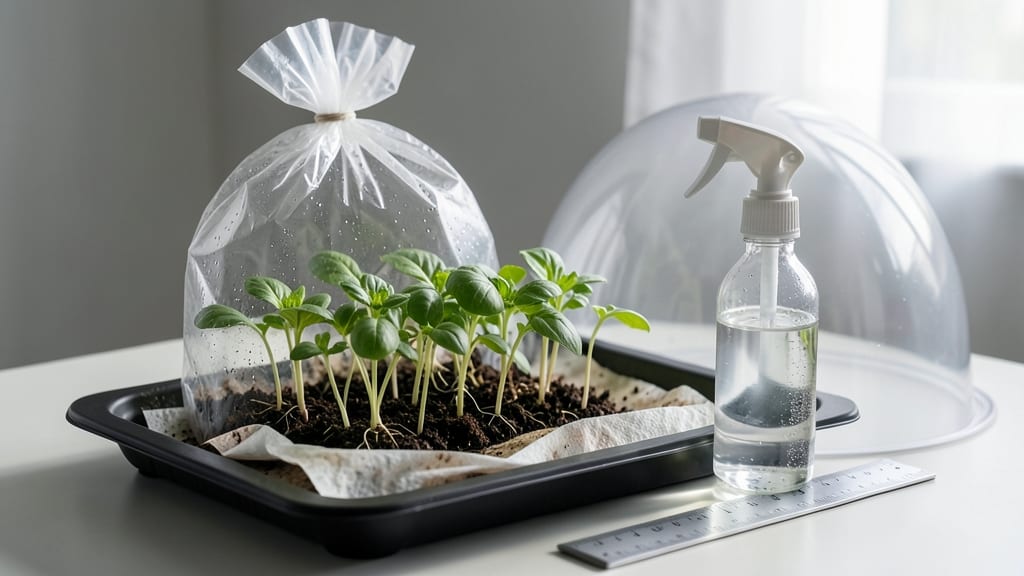
A plastic bag creates the perfect greenhouse for seeds to wake up in just 7 days. 🌱 I used this trick my first year of seed starting, and it cut my germination time in half—no fancy equipment needed.
The secret lies in trapping humidity and warmth right where the seeds need it most. All you need is a clear plastic bag, damp paper towels or seed-starting mix, and your seeds.
Place them in the bag, seal it loosely, and set it where your home stays warmest (like on top of the fridge). You’ll see tiny sprouts peeking through in less than a week—no waiting months for stubborn seeds to finally break through.
The results are shockingly lush seedlings with strong roots, ready to transplant without shock. Compare that to the slow, uneven starts you get with just a tray and a spray bottle. Plus, you skip the risk of drying out or overwatering that plagues beginner setups.
Best for fast-germinating seeds like lettuce, beans, and herbs. For slower starters like tomatoes, use this method to jumpstart them before moving to soil. Here’s how to do it right the first time!
📚 In This Guide
- What you need
- Instructions
- Tips and common mistakes
- Wrapping up and next steps
What you need
- ● Seed germination plastic bag: 1 x 1-gallon (or larger) clear, reusable plastic bag with a zip-top or twist-tie closure (e.g., Ziploc, Glad, or reusable silicone bags). Tip: Look for 100% plastic-free options if eco-friendly!
- ● Seeds: 5–20 seeds (depending on size; smaller seeds like lettuce need more). Pro tip: Choose fast-sprouting varieties like radish, microgreens, or basil for quick results! 🌱
- ● Growing medium: Option 1: 1–2 sheets of paper towels or coffee filters (for minimalist setup).
- ● Option 2: 1–2 inches of peat moss, coconut coir, or seed-starting mix (for soil-based germination).
- ● Spray bottle: 1 x 8–16 oz with a fine mist nozzle (e.g., spray bottle for seedlings).
- ● Scissors or knife: 1 x small pair for trimming materials.
- ● Humidity dome or lid: 1 x small plastic dome (alternative if no bag is available).
- ● Heat mat: 1 x small germination mat (keeps seeds warm; 70–85°F ideal).
- ● Grow lights: 1 x LED bulb or full-spectrum light (for post-sprout growth).
- ● Labels & markers: To track seed types and planting dates.
- ● Funnel or small container: For easy seed placement in soil.
Step-by-Step instructions for germinating seeds in a plastic bag
This humidity trick cuts germination time in half—here's how to do it right every time.
🌱 Step 1: Prepare Your Seeds and Growing Medium
Start by filling a small container—like a 4-inch pot or yogurt cup—with moistened seed-starting mix. Press it down gently until it's firm but not packed. The key here is even moisture without waterlogging. I like to tap the container on the counter a few times to settle the soil while keeping it loose enough for roots to push through.
Create a small indentation with your finger—about ¼ inch deep—and place 2-3 seeds inside. Planting a few increases your success rate, but don't overcrowd. Cover them lightly with more soil, just enough to hide them completely. This prevents them from drying out while they wait to sprout.
💧 Step 2: Mist and Seal for Perfect Humidity
Give the soil a light misting with water until it feels damp but not soggy. You want it to hold together when squeezed but not drip. Too much water now will suffocate your seeds. I use a spray bottle for this—it gives me precise control over moisture levels.
Place the container inside a clear plastic bag (like a gallon-sized ziplock). Seal it tightly but leave a tiny gap if needed for airflow—just enough to keep condensation inside. The bag creates a mini greenhouse, trapping warmth and humidity right where your seeds need it. This is where the magic happens: seeds germinate fastest when humidity stays at 80-90%.
☀️ Step 3: Position for Warmth and Light
Find a spot that stays between 70-80°F—a warm kitchen counter or on top of your fridge works perfectly. Avoid direct sunlight here; you want warmth, not heat. If your home runs cooler, place the bag near a heat source like a lamp (not too close—just enough to keep it cozy).
Check the bag daily for condensation on the inside. If it looks foggy, your humidity is perfect. If the soil looks dry, mist it lightly through the bag (don't open it) and reseal. You'll see the first tiny sprouts in 3-5 days—watch for the seed coats splitting open or the first green tips pushing through.
🌿 Step 4: Transition to Growing Conditions
Once you see 50% of seeds sprouted, open the bag immediately. Remove it completely after 24 hours to prevent mold or damping-off disease. This is critical: too much humidity now will rot those delicate seedlings. Move the container to a bright spot with indirect light for the first few days.
Water gently from the bottom by placing the container in ½ inch of water for 10 minutes. This encourages strong root growth without disturbing the seedlings. After a week, you can switch to top-watering—but keep it light. You'll know you're doing it right when the soil stays evenly moist but never soggy.
⏰ Step 5: Maintain Until True Leaves Appear
Keep the seedlings in their container until they develop 2-3 sets of true leaves** (not the first tiny seed leaves). This usually takes 10-14 days total from planting. During this time, rotate the container daily so they grow straight toward the light. You'll see leggy growth if they stretch toward a window—this means they need more light or a grow bulb.
When the first true leaves appear, your seedlings are ready for their next phase. At this point, you can either transplant them into individual pots or keep them grouped if they're slow growers. The plastic bag method gives you a head start, but now they need fresh air and space to thrive. I always harden them off gradually before moving outside—just like you would with any seedling.
Tips & tricks for perfect humidity-controlled seed germination
Here's what nobody tells you about making this method work flawlessly every time.
Soil Moisture Secret: After misting in Step 1, press the soil gently with your finger—it should hold together when squeezed but not drip water. Too much moisture suffocates seeds, while too little prevents germination. I like to think of it like wringing out a damp sponge: just enough to keep it moist without being soggy. This balance is why the 4-inch container works so well—it gives roots room to spread without water pooling.
Bag Placement Matters: In Step 3, position your sealed bag where it stays consistently between 70-80°F. A warm kitchen counter or fridge top is perfect, but avoid spots near drafts or air vents. I've seen seeds take twice as long to sprout when placed near a cold window—even though the room temperature was fine. The key is consistent warmth, not just any warm spot. If your home runs cooler, a small desk lamp (not too close!) can help maintain that ideal temperature range.
Sprout Timing Tip: Those 3-5 days for first sprouts can feel like forever, but here's the thing: if you don't see anything by day 5, check your humidity level. Open the bag just enough to peek inside—if you see condensation on the plastic, you're golden. If it looks dry, mist through the bag (don't open it completely) and reseal. The goal is that foggy greenhouse effect, not a dry desert environment. This simple check prevents most germination failures.
Transition Strategy: When you hit that 50% sprout mark in Step 4, act fast—open the bag immediately and remove it completely after 24 hours. I've seen seedlings develop mold within hours if left in high humidity too long. After removing the bag, place the container under bright indirect light. A south-facing window works great, but if your seedlings start stretching toward the light (leggy growth), they need more light or a grow bulb. This is where most gardeners make their first mistake—keeping them in the bag too long or moving them to direct sunlight too soon.
Pro Tips for Seed Germination Plastic Bag
- Here's what nobody tells you about making this method work flawlessly every time.
- Soil Moisture Secret: After misting in Step 1, press the soil gently with your finger—it should hold together when sq...
- Bag Placement Matters: In Step 3, position your sealed bag where it stays consistently between 70-80°F. A warm kitche...
Frequently asked questions
Got questions about using plastic bags for seed germination?
You’re not alone! Here are answers to the most common queries to help you master this humidity-controlled method like a pro.
How do I know if my seeds need a plastic bag for germination?
Use a plastic bag for seeds that thrive in high humidity (like chili peppers, tomatoes, or herbs) or delicate seeds (e.g., lettuce, basil). If your seed packet says "needs warmth and moisture," a bag is your best bet! For hardy seeds (e.g., beans, peas), skip it—they germinate fine in soil.
How long should I leave seeds in the plastic bag before planting?
Most seeds sprout in 3–7 days with the bag method. Check daily for tiny root hairs or green shoots—once you see these, it’s time to transplant! Overwatering or waiting too long can cause mold ( watch for fuzzy white/green growth).
What if my seeds aren’t germinating in the bag?
Try these fixes:
- Check temperature: Keep the bag in a warm spot (70–85°F). Use a heating mat if needed.
- Verify moisture: Mist seeds lightly if the bag feels dry (condensation should form on the inside).
- Test seed viability: Soak a few seeds in water overnight—if they sink, they’re likely good.
- Alternative method: Try the paper towel sandwich trick for stubborn seeds.
Can I reuse plastic bags for seed germination?
Not ideal! Plastic bags can harbor bacteria or mold after use. For reuse, wash them with hot, soapy water and dry completely. Better yet, grab cheap, clean bags each time—your seeds (and future sprouts) will thank you!
What’s a good alternative to plastic bags for humidity?
If you’re avoiding plastic, try:
- Glass jars with lids (great for small seeds like herbs).
- Clear plastic domes (like those for seed trays).
- Misting bottle + humidity tray (place trays on pebbles with water).
- Seedling heat mats with a humidity tent (use a towel draped over sticks).
Is mold in my plastic bag dangerous?
Mold is a sign your bag is too wet or seeds are overcrowded. While it’s not usually toxic to plants, it can smother seeds. Act fast: Remove moldy seeds, improve airflow (poke tiny holes in the bag), and reduce moisture. If mold spreads, start over with fresh seeds and a cleaner setup.
Wrapping up and next steps
Mastering seed germination with a plastic bag is a game-changer—whether you're a gardening newbie or a seasoned pro! 🌱 By controlling humidity and warmth, you’ll watch tiny sprouts emerge in just 7 days, giving your plants a head start.
The best part? It’s simple, cost-effective, and reusable—no fancy equipment needed.
Ready to grow with confidence? Start with fast-sprouting seeds like beans or lettuce, then expand to your favorite varieties. Once you’ve perfected the method, try scaling up—like creating a mini greenhouse for seedlings! Happy planting! 🌟