
Lawn
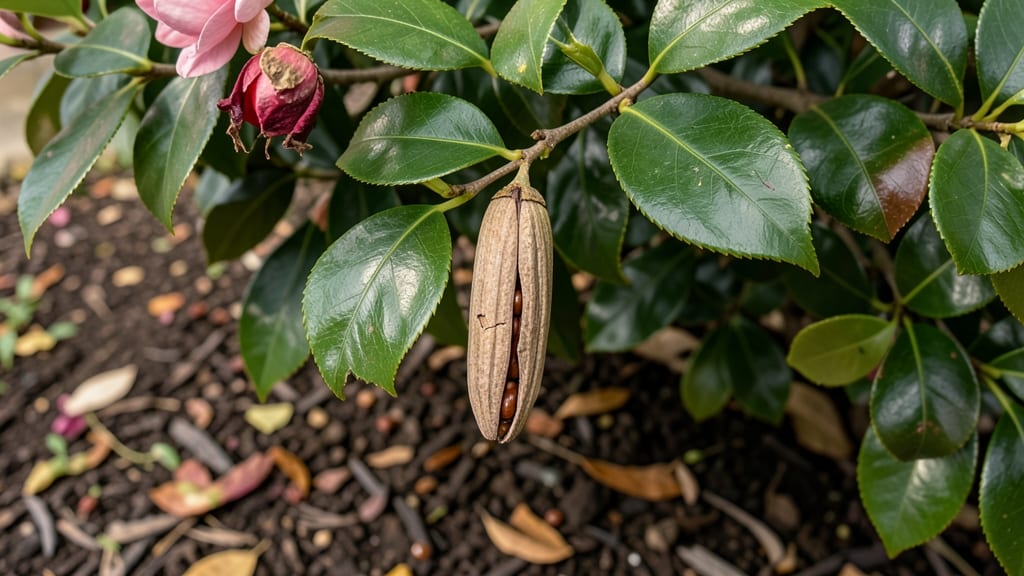
Those leathery camellia seed pods hold your plant’s future—if you know when to harvest them. 🌿 I’ve cracked the code on collecting dry-ripened pods that yield strong seedlings, and it starts with timing: wait until they turn brown and split open naturally, usually in late winter or early spring.
Gathering the pods is just the first step—what comes next is the tricky part. You’ll need to extract the seeds, soak them to break dormancy, and plant them in a warm, humid environment.
Most gardeners skip the soaking step and end up with poor germination, but I’ve found that a 3-4 week cold stratification followed by a quick warm soak works best for me.
By mid-spring, you’ll see those first tiny sprouts pushing through the soil, and with proper care, they’ll grow into sturdy young camellias ready for transplanting.
The smell of damp soil and the sight of new growth make every step worth it—especially when you realize you’re growing a plant that could live for decades.
This method works for both gardeners with established camellias and those starting from scratch. Just be patient—camellias grow slowly, but the payoff of a thriving plant is unbeatable. Let’s get those seeds growing!
📚 In This Guide
- What you need
- Instructions
- Tips and common mistakes
- Wrapping up and next steps
What you need
- ● Camellia seed pods: 3–5 fresh, dry-ripened pods (harvested in late fall or winter when they turn brown and slightly leathery).
- ● Sharp pruning shears or scissors: For carefully snipping open pods without damaging the seeds.
- ● Paper towels or coffee filters: To line a tray for seed extraction and drying.
- ● Small plastic bags or airtight containers: For short-term seed storage (e.g., ziplock bags with a damp paper towel).
- ● Seed-starting mix: 1–2 cups of well-draining, sterile potting soil (avoid garden soil—it may harbor pathogens).
- ● Seed trays or small pots: 4–6 individual containers (2–3 inches deep) with drainage holes.
- ● Spray bottle: For gentle watering to keep seeds moist without over-saturating.
- ● Plastic wrap or humidity dome: To create a mini greenhouse effect while seeds germinate.
- ● Grow lights or sunny windowsill: A south-facing window or LED grow lights (12+ hours of light daily).
- ● Hydrogen peroxide (3% solution): For sterilizing seeds or tools (1 tbsp per cup of water).
- ● Fungicide (organic, like neem oil): To prevent mold during germination.
- ● Heat mat: Speeds up germination (70–75°F is ideal for camellia seeds).
- ● Labeling tags: To track seed varieties and planting dates.
- ● Outdoor nursery area: A sheltered spot for hardening off seedlings before transplanting.
Step-by-step guide to harvesting and growing camellia seeds from dry-ripened pods
Here’s how to collect, process, and plant camellia seeds for reliable germination year after year.
🌿 Step 1: Identify and Harvest Mature Seed Pods
Camellia seed pods turn from green to a dry, papery brown when ready—usually 6-8 months after flowering. Gently twist the pod from the stem (don’t pull—it’ll tear). If it resists, it’s not fully ripe. Place pods in a paper bag (not plastic) to catch seeds as they dry.
Real talk: Overripe pods split open on their own, scattering seeds everywhere. Harvest them before they self-seed if you want control. Store pods in a cool, dry place (like a garage) for 2-4 weeks to finish drying. You’ll know they’re ready when they open easily with a slight squeeze.
🪴 Step 2: Extract and Stratify Seeds for Germination
Split open the dried pods to reveal 1-3 glossy black seeds per pod. Remove any shriveled or insect-damaged seeds—only plump, firm ones will sprout. Soak the remaining seeds in lukewarm water for 24 hours to soften the hard outer shell, which speeds up germination.
After soaking, place seeds between damp paper towels in a sealed plastic bag. Store them in the fridge (34-40°F) for 30-60 days to mimic winter stratification. Check weekly—towels should stay moist but not soggy. This cold treatment breaks dormancy, so don’t skip it.
☀️ Step 3: Prepare Soil and Plant Stratified Seeds
Fill 4-inch pots with a mix of 50% peat moss and 50% perlite—camellias hate dense soil. Moisten the mix until it’s damp like a wrung-out sponge. Plant 2-3 seeds per pot, pressing them ½ inch deep into the soil. Label pots with the variety and date, since germination can take 3-6 months.
Place pots in a shady spot (bright indirect light) and keep soil consistently moist. A humidity dome helps, but remove it once sprouts appear. Camellia seedlings are slow starters—patience is key. You’ll spot the first true leaves (not the tiny seed leaves) in 8-12 weeks, signaling it’s time to move them.
⏰ Step 4: Transplant and Care for Young Seedlings
When seedlings have 3-4 sets of leaves (about 6-12 months old), transplant them into 6-inch pots with acidic potting mix (pH 5.5-6.5). Camellias are fussy about soil—amend with sulfur if your mix isn’t acidic. Keep them in partial shade for their first year, gradually introducing more sun.
Water deeply once a week, letting excess drain away. Overwatering causes root rot, which kills seedlings fast. Fertilize lightly with a balanced 10-10-10 formula in spring, but hold off until new growth appears. Young camellias need 2-3 years to mature enough for outdoor planting.
Tips & tricks for perfect camellia seed pod germination
These simple tricks will help you maximize your chances of successfully growing camellia seedlings from dry-ripened pods.
Pod Ripeness Check: The 6-8 month waiting period for mature pods can feel endless, but here's how to tell when they're truly ready: Give the pod a gentle squeeze—it should open easily with just a slight pressure. If it cracks open on its own, you've missed the window. I've learned this the hard way after trying to salvage partially opened pods that yielded shrunken, non-viable seeds. Store harvested pods in a paper bag in a cool, dry place for that crucial 2-4 week drying period before opening them.
Seed Selection Matters: When you split those dried pods open, you'll typically find 1-3 glossy black seeds. This is where many gardeners make their first mistake—using seeds that look good but aren't actually viable. Look for seeds that are plump, firm, and completely black with no white spots or shriveled areas. I've had better success rates when I discard even slightly questionable seeds rather than taking chances. Remember, only the best seeds will produce healthy seedlings.
Stratification Success: That 30-60 day cold treatment in the fridge is non-negotiable for breaking dormancy. I've tried skipping it with mixed results—some seeds germinate, but many remain stubbornly dormant. Place your seeds between damp paper towels in a sealed plastic bag and store them in the fridge at 34-40°F. Check them weekly to ensure the towels stay moist but not soggy. The cold treatment mimics winter conditions that trigger germination in nature.
Soil Mix Secrets: The 50/50 peat moss and perlite mix is essential for camellia seeds. I've experimented with different ratios and found that anything less than 50% perlite can lead to compacted soil that suffocates young roots. Moisten the mix until it's damp like a wrung-out sponge—this consistency is crucial. Too dry and seeds won't germinate; too wet and you risk root rot before the seedlings even emerge.
Pro Tips for Camellia Seed Pod
- These simple tricks will help you maximize your chances of successfully growing camellia seedlings from dry-ripened p...
- Pod Ripeness Check: The 6-8 month waiting period for mature pods can feel endless, but here's how to tell when they'r...
- Seed Selection Matters: When you split those dried pods open, you'll typically find 1-3 glossy black seeds. This is w...
Frequently asked questions
Got questions about growing camellia seed pods? You’re not alone—these unique plants can be tricky to master! Below, we’ve rounded up the most common queries from gardeners, from timing to troubleshooting. Whether you’re a first-timer or a seasoned grower, these answers will help you cultivate healthy pods and viable seeds year after year.
When do camellia seed pods typically ripen?
Camellia seed pods usually ripen between late winter and early spring, depending on your climate. In warmer regions, they may mature as early as December, while cooler zones could see ripening in February or March. Look for pods that turn brown and dry—they should rattle when shaken, signaling it’s time to harvest!
How long does it take for camellia seed pods to dry?
Once harvested, camellia seed pods need 4–6 weeks to fully dry indoors in a warm, well-ventilated spot. Spread them out on a tray or hang them upside down to prevent mold. If humidity is high, use a fan to speed up the process. Patience is key—rushing can ruin seed viability!
Can I grow camellia from seed pods, or do I need to buy seeds?
The seeds inside camellia pods are 100% viable for propagation. Just scoop out the plump, dark seeds, clean off the pulp, and plant them in moist seed-starting mix. However, note that seed-grown camellias may take 3–5 years to flower—patience pays off for unique varieties!
Why aren’t my camellia seed pods opening or drying?
If your pods stay green or leak sap, it’s often due to overwatering, poor airflow, or immature pods. Try these fixes:
- Move pods to a dry, shaded spot (direct sun can overheat them).
- Check for pests like scale insects—treat with neem oil if needed.
- Ensure your camellia plant is well-draining—waterlogged roots stress the plant.
Do camellia seed pods grow in all climates?
Camellias thrive in USDA Zones 7–10, but seed pods may struggle in extreme cold (below 10°F) or scorching heat. In colder regions, harvest pods early and dry them indoors. For hot climates, provide afternoon shade to prevent premature drying. Adaptability is key—observe your local microclimate!
Pro Tip:
Label your pods as they ripen! Camellia varieties can vary widely, and tracking sources helps you recreate successful conditions next season. A simple spray bottle and a Sharpie go a long way.
Wrapping up and next steps
Growing camellia seed pods is a rewarding journey that connects you to nature’s beauty—and with patience, you can enjoy year-after-year blooms. Whether you’re a seasoned gardener or just starting, the key lies in proper pod harvesting, seed stratification, and nurturing young seedlings.
Your efforts will soon be rewarded with stunning camellia flowers that bring elegance to any landscape! 🌸
Ready to take the next step? Start small—plant a few seeds in pots or directly in your garden—and watch your camellia plants thrive. Happy growing! 🌱