
Lawn
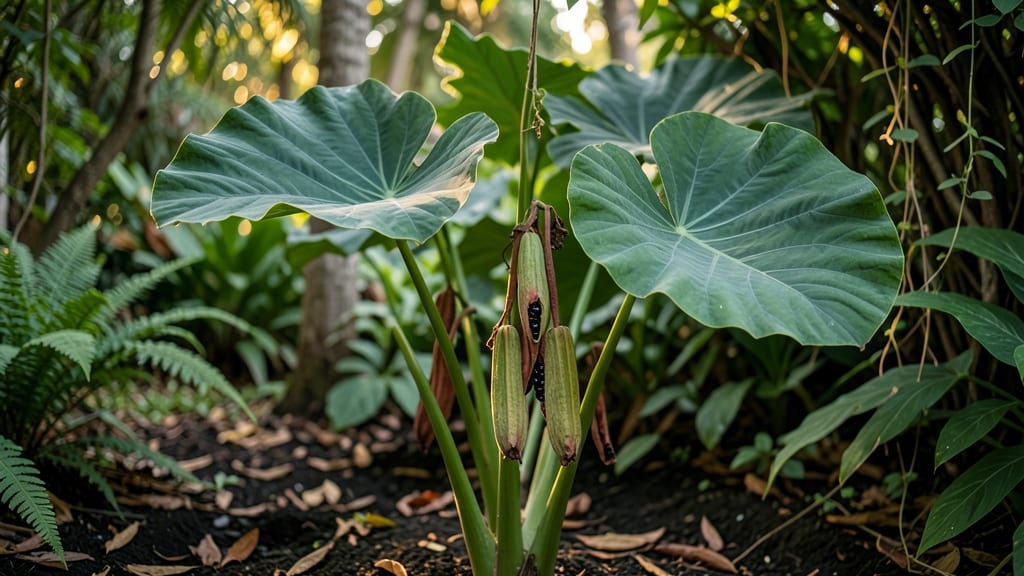
Elephant ear seed pods are nature’s way of making next year’s garden even more dramatic. 🌿 I’ve learned that these giant, velvety leaves don’t always come from tubers—sometimes they’re the result of patient seed-saving. The key? Proper drying and storage, because fresh seeds won’t germinate well.
Most gardeners skip this step and just divide tubers, but there’s something satisfying about growing a new plant from seed. You’ll need a warm, dry spot to let the pods mature fully before cracking them open.
A single pod can yield dozens of tiny, glossy seeds that’ll become your next generation of pollinator-friendly foliage. Once dried, germination takes 4-6 weeks in warm soil, but don’t expect perfect results—seed-grown elephant ears often take longer to mature than tuber-grown ones.
Still, the thrill of watching those massive leaves unfurl from a seedling you nurtured makes it worth the wait. For beginners, this is a great way to experiment with propagation without breaking the bank.
Just be patient—seed-grown plants might not bloom as early as tubers, but they’ll bring that same showstopping impact to your garden.
📚 In This Guide
- What you need
- Instructions
- Tips and common mistakes
- Wrapping up and next steps
What you need
- ● Mature elephant ear seed pods (harvested when dry and brown, ~3–4 inches long)
- ● Sharp pruners or scissors (for clean harvesting)
- ● Paper bags or breathable mesh bags (1–2 bags per pod, 10x12 inches)
- ● Drying rack or elevated surface (wire mesh, wooden crate, or hanging twine)
- ● Labeling tags & marker (to track varieties)
- ● Desiccant packets (for extra-dry environments)
- ● Fan or dehumidifier (to speed up drying in humid climates)
- ● Glove (to protect hands from prickly pods)
- ● Storage jars or envelopes (airtight, labeled for seed saving)
How to harvest and dry elephant ear seed pods for future plantings
Here's the simple process I use to save seeds from my elephant ears and ensure next year's garden thrives with these pollinator magnets.
🌿 Step 1: Identify and Harvest Mature Seed Pods
Wait until the seed pods turn a deep brown color and begin to split open naturally. This usually happens in late fall after the foliage has died back. I look for pods that are dry to the touch—when I gently squeeze one, it should feel papery and crumble slightly rather than stay firm.
Use clean, sharp gardening shears to snip the pods from the stalk. Be careful not to cut into the stem below the pod, as this can introduce moisture that encourages rot. Place the harvested pods in a paper bag to allow any remaining moisture to evaporate naturally over the next day or two.
💧 Step 2: Dry the Seed Pods Thoroughly
Spread the harvested pods out on a clean, dry surface in a well-ventilated area. I prefer using a mesh screen or a piece of window screen supported by a frame to allow air to circulate on all sides. Keep them out of direct sunlight, which can overheat and damage the pods.
Check the pods every few days, turning them gently to ensure even drying. They're ready when the pods feel completely dry and brittle—when you open one, the seeds inside should rattle rather than feel damp. This typically takes about 2-3 weeks, depending on your climate's humidity levels.
✂️ Step 3: Extract and Store the Seeds
Once the pods are fully dry, place them in a paper bag and gently crush them with your hands or a rolling pin to release the seeds. I like to do this over a sheet of white paper so I can easily see the seeds and separate any debris. Elephant ear seeds are large and flat, making them easy to identify and collect.
Store the seeds in an airtight container, such as a small glass jar or envelope, in a cool, dry place. Label the container with the variety name and the date of harvest. Seeds stored this way remain viable for 1-2 years, so you can plan ahead for next season's garden.
🪴 Step 4: Prepare Seed Pods for Planting Next Season
In early spring, fill small pots with seed-starting mix and plant the seeds about ½ inch deep. Elephant ear seeds germinate best in warm soil, so I use a seedling heat mat set to 75-80°F to speed up the process. Keep the soil consistently moist but not soggy, and place the pots in a warm, bright location.
You'll see seedlings emerge in about 2-4 weeks. Once the seedlings have developed 2-3 true leaves, they're ready to be transplanted into larger pots or directly into the garden after the last frost date. I always harden off my seedlings by gradually exposing them to outdoor conditions over 7-10 days before planting them outside.
Tips & tricks for perfect elephant ear seed pod preservation
Real talk: Harvesting and drying seed pods correctly makes all the difference for next year's garden success. Here's what I've learned after years of trial and error.
Timing Secret: In Step 1, don't rush harvesting—wait until pods are completely dry and begin splitting naturally. I've learned the hard way that harvesting too early means seeds won't be fully mature, and you'll end up with poor germination rates. The deep brown color and papery texture are your perfect indicators.
Drying Strategy: For Step 2, I've found that using a mesh screen with good airflow is key. Place it in a spot where you can check daily without disturbing the pods too much. If your climate is particularly humid (like mine in the Southeast), you might need to extend the 2-3 week drying period by a few days. The goal is complete dryness—seeds should rattle when you shake the pods.
Storage Wisdom: When storing seeds in Step 3, I always add a small packet of silica gel to my airtight container. This extra step prevents moisture buildup that can reduce seed viability. Labeling with the harvest date is crucial—seeds remain viable for 1-2 years, but freshness matters for best results.
Pro Tips for Elephant Ear Seed Pod
- Real talk: Harvesting and drying seed pods correctly makes all the difference for next year's garden success.
- Timing Secret: In Step 1, don't rush harvesting—wait until pods are completely dry and begin splitting naturally.
- Drying Strategy: For Step 2, I've found that using a mesh screen with good airflow is key.
Frequently asked questions
Got questions about elephant ear seed pods? You’re not alone!
Whether you’re a first-time gardener or a seasoned pollinator enthusiast, these answers will help you master the drying process and ensure a bountiful harvest for next year’s blooms.
How do I know when elephant ear seed pods are ready to harvest?
Harvest your seed pods when they turn brown and papery, usually 4–6 weeks after flowering. Gently twist or cut them from the stem—they’ll feel dry and brittle to the touch. Pro tip: Wait until they’re fully mature to avoid mold or premature sprouting!
Should I dry elephant ear seed pods indoors or outdoors?
Both work, but outdoors is best! Place pods in a well-ventilated, dry spot (like a mesh bag or screen) for 2–4 weeks, protected from direct sun and moisture. If indoors, use a cool, dry area (like a pantry) with occasional airflow to prevent mold.
What if my seed pods mold or rot before drying?
Mold or rot usually means too much humidity. To fix it:
- Move pods to a drier location immediately.
- Spread them out on paper towels to speed drying.
- Use a fan on low for gentle airflow.
How long can I store dried elephant ear seeds?
Store seeds in a cool, dark place (like a sealed jar or envelope) for 1–2 years. Label them with the date! For best germination, plant within 6 months—freshness matters.
Can I use elephant ear seed pods from any variety?
Yes, but stick to one variety if you want predictable blooms. Cross-pollination can create unexpected hybrids! If you’re unsure, label pods by color/size. Bonus: Save seeds from disease-resistant plants for stronger next-year growth.
Wrapping up and next steps
Drying elephant ear seed pods is a simple yet rewarding way to ensure next year’s vibrant blooms while supporting local pollinators! 🌸 By following these easy steps—harvesting at the right time, using breathable containers, and storing them properly—you’ll be well on your way to a stunning garden. Your efforts today will bring beauty and life tomorrow!
Ready to take it further? Share your dried pods with fellow gardeners or plant them in a community pollinator garden. Every small action helps ecosystems thrive—so get growing and inspire others to do the same! 🌿