
Lawn
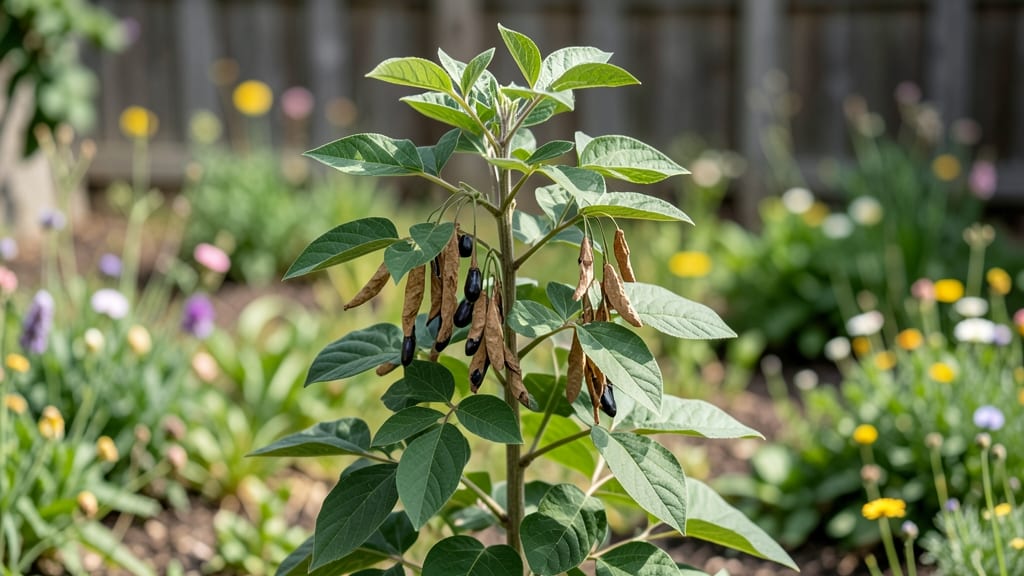
Those fragrant, papery seed pods of false indigo (Baptisia australis) are nature’s most elegant time capsules—if you dry them right, you’ll have next year’s plants before spring arrives. 🌿 I’ve learned the hard way that rushing the process turns them to dust, but mastering this one skill means you’ll always have fresh starts.
The secret lies in patience: let the pods mature fully on the plant, then harvest them at just the right moment for perfect preservation.
You’ll need a well-ventilated space, a breathable bag or envelope, and a little time—about 4-6 weeks of slow drying. False indigo thrives in full sun and well-draining soil, but its seed pods need extra care once they’re off the plant.
The key is balancing moisture and airflow to prevent mold while keeping the seeds viable. I’ve dried pods in my garage, a sunny windowsill, and even a dehydrator (set low), and each method works—just differently.
By the time you’re done, you’ll have a stash of fragrant, heirloom-quality seeds ready to plant in early spring.
The dried pods themselves make stunning winter arrangements, but the real magic happens when you tuck them into moist soil: germination rates improve when you stratify them for 60-90 days in the fridge. That’s how you turn last year’s blooms into next year’s drought-tolerant, pollinator-loving garden stars.
Here’s the kicker: false indigo’s deep roots make it nearly impossible to kill, but poor seed drying can ruin your chances before they even sprout. Whether you’re saving seeds for your first plants or expanding your collection, this method ensures you’ll have strong, vigorous starts every season.
Let’s get those pods dried right!
📚 In This Guide
- What you need
- Instructions
- Tips and common mistakes
- Wrapping up and next steps
What you need
- ● False indigo seed pods: Freshly harvested pods (ensure they’re fully mature but not yet opened—look for a papery, dry texture). Aim for 50–100 pods depending on your drying space.
- ● Drying trays or screens: Flat, breathable surfaces (e.g., window screens, mesh drying racks, or wooden frames with mesh). Size should accommodate your pod quantity—18"x24" or larger works well.
- ● Paper towels or parchment paper: To line trays and absorb excess moisture. Use 1–2 sheets per tray.
- ● Rubber bands or twine: For securing pods to trays or hanging them (if air-drying). 5–10 pieces should suffice.
- ○ Fan or dehumidifier (optional but helpful): To circulate air and speed up drying. Place near your drying area for optimal airflow.
- ● Small paper bags or envelopes: For storing dried pods. 50–100 bags (based on pod count) with breathable material (e.g., brown kraft paper).
- ● Permanent marker or labels: To tag pods with the harvest date.
- ● Dry, shaded space: A cool, well-ventilated area (e.g., garage, shed, or covered porch) with 50–70°F temperatures and low humidity (below 50%). Avoid direct sunlight to prevent discoloration.
- ● Patience: Drying takes 2–4 weeks, depending on conditions. Check pods weekly for dryness (they should rattle when shaken).
- ○ Gloves (optional): To protect hands from seed pod prickles if handling large quantities.
How to harvest and preserve false indigo seed pods
False indigo thrives on patience—here's how to turn its striking pods into next season's garden treasure.
🌿 Step 1: Identify and Harvest Mature Seed Pods
Wait until pods turn a rich, papery brown and begin splitting open naturally—this usually happens 8-12 weeks after flowering. You'll notice the seed pods develop a dry, papery texture and the seams start cracking open slightly. Harvest on a dry morning when dew has evaporated to prevent moisture from sticking to the seeds.
Gently twist each pod from the stem rather than cutting it—this preserves the plant's energy for any remaining blooms. Place harvested pods in a single layer on a clean, dry surface. Avoid stacking them as trapped moisture can cause mold. I like to spread them out on a mesh screen or old window screen to allow airflow on all sides.
⏰ Step 2: Dry Pods Under Controlled Conditions
Find a warm, dry location with good air circulation—70-75°F and 40-50% humidity works best. A well-ventilated garage, covered porch, or even a sunny windowsill (out of direct sunlight) will do. Avoid basements or enclosed spaces where humidity builds up. You'll know drying is progressing when the pods feel light and brittle when gently squeezed.
Check pods daily for 2-3 weeks. The drying process is complete when the pods rattle when shaken and the seeds inside move freely with no moisture clinging to them. If you notice any mold or musty smell developing, move the pods to a drier location immediately. False indigo seeds are sensitive to excess moisture during drying.
🪴 Step 3: Extract and Store Seeds Properly
Once completely dry, gently crush each pod between your fingers over a clean surface to release the seeds. You'll see small, dark brown seeds that look almost like tiny beans. I use a fine mesh strainer to catch any seed fragments that might fall through. Remove any debris or empty pod fragments by hand—pure seeds store best.
Store seeds in a cool, dark place in an airtight container. I use small glass jars with tight-sealing lids, labeled with the variety and harvest date. False indigo seeds remain viable for 3-5 years when stored properly. For best results, plant them within 1-2 years of harvest—they germinate most reliably when fresh.
☀️ Step 4: Prepare for Next Season's Planting
In early spring, soak seeds overnight in lukewarm water to soften their tough outer coating. This 12-hour soak significantly improves germination rates. Plant seeds ¼ inch deep in well-draining soil and keep them consistently moist until germination, which typically occurs in 14-21 days at 70-75°F.
Young false indigo plants are slow to establish but reward patience with their striking foliage and fragrant blooms. Here's the thing—these plants thrive in full sun but tolerate partial shade. You'll see the first true leaves emerge in 3-4 weeks, and that's your cue to start fertilizing lightly with a balanced organic fertilizer to encourage strong root development.
Tips & tricks for perfect false indigo seed pod preservation
False indigo's beauty lies in its patience—here's how to elevate your seed-saving game without losing a single pod to mold or moisture.
Timing is Everything: The 8-12 week window after flowering is critical for harvesting. I've learned to mark my calendar when the first flowers appear—this gives me a precise countdown to harvest time. Watch for the pods to develop that signature papery texture and slightly cracked seams; these are your cues that nature's ready to release the seeds. Harvesting too early means immature seeds that won't germinate well, while waiting too long risks the pods splitting open naturally and scattering seeds prematurely.
Drying Environment Secrets: While the 70-75°F and 40-50% humidity range works well, I've found that adding a small fan near your drying pods creates just the right airflow without disturbing them. Place the pods on a screen over a tray to catch any stray seeds—this keeps everything contained while allowing that crucial airflow. If you notice condensation forming on the pods during the 2-3 week drying period, move them to a warmer, drier spot immediately. False indigo seeds are particularly sensitive to moisture at this stage.
Storage Wisdom: The 3-5 year viability window is impressive, but I've discovered that adding a small packet of silica gel to your storage container extends freshness even further. Label your containers with both the harvest date and planting date—this prevents the "I think I planted these last year" confusion that leads to wasted seeds. For best results, store seeds in the refrigerator rather than at room temperature, especially if you're planning to keep them beyond 2 years. The cooler temperature helps preserve their viability longer.
Germination Boost: That 12-hour overnight soak is non-negotiable for breaking the seeds' tough outer coating, but I've found an extra step makes all the difference. After soaking, gently rub the seeds between two layers of paper towel to remove any remaining seed coat fragments. This extra friction helps the seed coat break down even more, giving you faster and more uniform germination. Plant immediately after this treatment while the seeds are still moist—don't let them dry out before going into the soil.
Pro Tips for False Indigo Seed Pods
- False indigo's beauty lies in its patience—here's how to elevate your seed-saving game without losing a single pod to...
- Timing is Everything: The 8-12 week window after flowering is critical for harvesting. I've learned to mark my calend...
- Drying Environment Secrets: While the 70-75°F and 40-50% humidity range works well, I've found that adding a small fa...
Frequently asked questions
about false indigo seed pods—because even experts need a little clarity! Here are answers to the most common questions to help you master drying and saving these fragrant treasures.How do I know when false indigo seed pods are ready to harvest?
Harvest seed pods when they turn a tan or light brown color and begin to split open naturally. If you wait too long, seeds may scatter or sprout prematurely. Aim for late summer to early fall, just as the pods start drying on the plant.
Can I dry false indigo seed pods indoors?
Yes! Place pods in a single layer on paper towels or a mesh screen in a warm, dry, and well-ventilated area (like a sunny windowsill or near a fan). Avoid direct sunlight or heat sources, which can crack the pods. Turn them occasionally for even drying.
What should I do if my dried pods still feel damp?
If pods remain moist after a few weeks, extend drying time by placing them in a paper bag with silica gel packets or a dehydrator on low heat (95°F). Check daily—over-drying can make pods brittle, while under-drying risks mold.
Are there alternatives to drying pods naturally?
For faster results, try a dehydrator (95–115°F for 2–4 hours) or an oven (170°F with the door cracked open). Air-drying is safest for seed viability, but these methods work in a pinch. Just avoid high heat!
How long do false indigo seeds stay viable after drying?
Properly dried seeds in a cool, dark place (like a sealed jar in the fridge) can stay viable for 2–3 years. Test germination annually by planting a few seeds—if they sprout, your stash is still good!
Wrapping up and next steps
Mastering the art of drying false indigo seed pods ensures a bountiful harvest of fragrant blooms for seasons to come! 🌿 Whether you’re a seasoned gardener or just starting out, proper drying techniques—like air-drying or using a dehydrator—will help preserve those precious pods for next year’s planting. Don’t let your hard work go to waste!
Now that you’re equipped with the how-to, why not take the next step? Share your success with fellow gardening enthusiasts, experiment with creative uses for the dried pods, or even start a small batch for gifts. Happy gardening—and may your false indigo thrive! 🌸