
Lawn
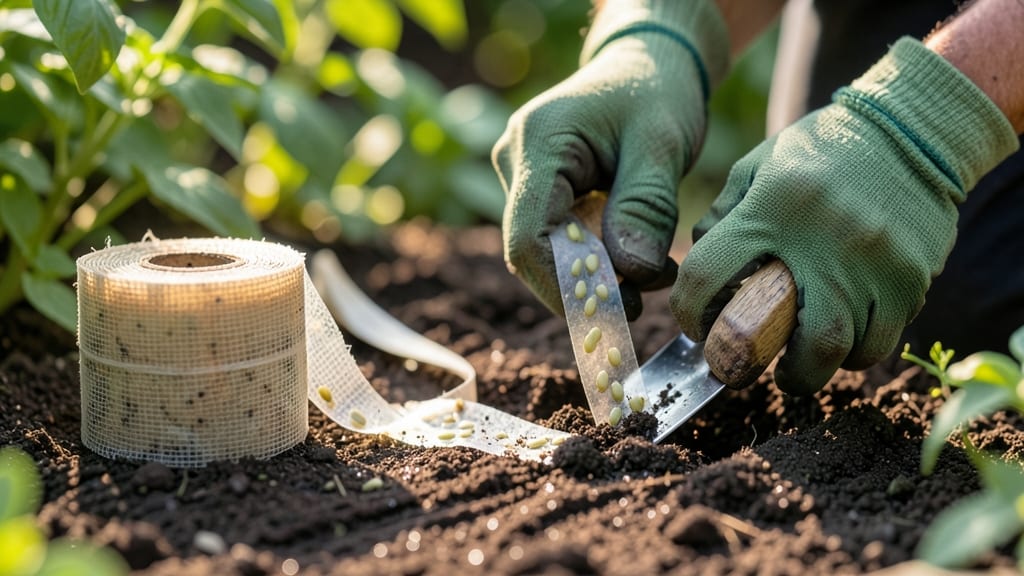
Straight rows, perfect spacing, and no more guessing—garden seed tape makes planting look easy. 🌱 I spent years wrestling with uneven rows and overcrowded seedlings until I discovered this game-changer.
The tape holds seeds at the exact distance they need, so you plant faster and get stronger plants from day one.
This isn’t just for beginners—it works for herbs, flowers, and even vegetables like beans and carrots. The tape dissolves or biodegrades, so you avoid plastic waste while keeping weeds out.
Just pull the tape through marked rows, press lightly, and water. No more digging individual holes or dealing with uneven germination.
You’ll see neat, uniform rows that make weeding a breeze and give plants room to thrive. The tape even helps with succession planting—just follow the same spacing guidelines. Perfect for small gardens, raised beds, or large plots where precision matters.
Fair warning: the tape can feel stiff at first, so work slowly. And if you’re planting deep-rooted crops, check the tape’s depth recommendations—some types are better for shallow seeds like lettuce. Once you try it, you’ll never go back to scattering seeds by hand.
📚 In This Guide
- What you need
- Instructions
- Tips and common mistakes
- Wrapping up and next steps
What you need
- ○ Garden seed tape – Choose pre-seeded tapes (like marigold, basil, or sunflower) or DIY with your own seeds (see optional tools below). A standard roll covers ~100–200 ft, depending on the brand.
- ● Biodegradable tape – If making your own, opt for compostable paper or plant-based tape (avoid plastic!). Widths typically range from ¼” to ½”.
- ● Seeds – Fasten them to the tape with a water-soluble glue (like flour paste or commercial seed tape adhesive). Aim for 1–2 seeds per inch for optimal spacing.
- ● Water – A spray bottle or small watering can for activating the tape and moistening soil.
- ○ Garden twine or string – For marking rows (optional but helpful for alignment). Use biodegradable twine if eco-friendly.
- ● Measuring tape or ruler – To ensure straight, even rows (aim for 12–24” spacing between rows, depending on plant needs).
- ● Garden stakes or pins – Lightweight stakes or wooden toothpicks to secure the tape in place before planting.
- ● Gloves – A pair of gardening gloves to protect your hands from soil and adhesive.
- ● Hoe or trowel – For creating shallow furrows (if not using pre-made seed tape slots).
- ● Prepped soil – Loosen the top 2–3 inches of soil and remove weeds/debris. Seed tape works best in moist, well-draining soil.
- ● Sunlight & spacing knowledge – Check your plants’ sunlight requirements (e.g., full sun for tomatoes, partial shade for lettuce) and plan row spacing accordingly.
- ● Weather forecast – Plant on a cool, cloudy day to reduce moisture loss. Avoid windy days!
- ● Seed tape maker kit – If DIY-ing, a seed tape applicator or stencil can speed up the process.
- ● Organic mulch – Straw or shredded leaves to suppress weeds and retain moisture after planting.
- ● Row cover or shade cloth – Protects young seedlings from pests or harsh sun.
- ● Plant labels – Small stakes or tags to track what you’ve planted (especially useful for mixed seed tapes!).
Step-by-step instructions for using garden seed tape
Here's how to plant perfectly straight rows with minimal effort—no more guessing or bending over.
🌱 Step 1: Prepare Your Seed Tape and Soil
Start by unwinding your seed tape—it's pre-spaced with seeds embedded in a water-soluble tape. Check the spacing guide on the package to ensure you're planting seeds at the correct distance for your chosen plants. I like to lay the tape on a flat surface first to inspect it for any breaks or misaligned seeds.
Next, prepare your soil by removing any weeds or debris from the planting area. Loosen the top 4-6 inches of soil with a rake or hoe to create a smooth, level bed. This ensures the tape will lie flat and seeds make good contact with the soil. Water the area lightly before planting to help the tape dissolve evenly.
💧 Step 2: Lay and Secure the Seed Tape
Unroll the seed tape along your planting line, aligning it with the direction you want your plants to grow. For most vegetables, this means running the tape in the same direction as the prevailing wind to reduce lodging. Press the tape gently into the soil, ensuring it makes contact with the moist surface—this helps the water-soluble coating dissolve faster.
To keep the tape in place, use small stakes or pins (included with many seed tape kits) to secure the edges. Space stakes about 12 inches apart for stability. If you're planting a long row, work in sections—unroll 2-3 feet at a time, plant, then move forward. This prevents the tape from curling or shifting before you can secure it.
☀️ Step 3: Water and Monitor Germination
Water the planted tape thoroughly but gently—avoid blasting it with a hose, as this can dislodge seeds or wash away the tape. A gentle stream or watering can works best. You'll see the tape begin to dissolve within minutes, releasing the seeds into the soil. The goal is to keep the soil consistently moist until germination, which usually takes 7-14 days depending on the plant type.
Watch for the first signs of sprouts—you'll notice tiny green tips pushing through the soil along your planted line. Once 50% of seeds have sprouted, you can remove the stakes and adjust any plants that didn’t align perfectly. Thin seedlings if necessary, but seed tape usually ensures even spacing from the start.
✂️ Step 4: Maintain and Thin as Needed
After germination, continue to water at the base of the plants to avoid disturbing the roots. Seed tape reduces weeds naturally, but you may still need to pull a few stragglers. I like to mulch around the rows with straw or grass clippings to retain moisture and suppress weeds further.
If any seeds fail to sprout, fill the gaps by transplanting seedlings from another source. Most seed tape kits include extra seeds, so check the package for replacements. Once plants reach 2-3 inches tall, thin them to the recommended spacing if needed—though seed tape usually gets this right the first time.
🌿 Step 5: Harvest with Confidence
Seed tape ensures your plants mature evenly, making harvesting a breeze. You’ll notice rows of uniform height and spacing, which simplifies picking and reduces damage to neighboring plants. For leafy greens like lettuce or herbs, start harvesting outer leaves once they reach 3-4 inches to encourage continuous growth.
For root crops or fruits, wait until the plants reach full maturity—check the seed packet for specific harvest times. The precision of seed tape means you’ll have a tidy, productive garden with minimal weeding or thinning. Plus, the straight rows make it easy to spot pests or diseases early, so you can address them before they spread.
Tips & tricks for perfect garden seed tape planting
These simple strategies will help you get the most out of your seed tape and avoid common gardening headaches.
Pre-Inspection Pays Off: Before planting, lay your seed tape on a flat surface and visually inspect each seed pocket. I’ve found that some tapes have occasional weak spots or misaligned seeds—catching these early means you won’t have gaps later. This is especially important for small seeds like carrots or radishes where spacing matters most.
Soil Prep Secret: The instructions mention loosening the top 4-6 inches of soil, but here’s what I do differently: I add a thin layer of compost to the loosened soil before planting. This gives your seedlings a nutrient boost right from the start while maintaining good soil contact with the tape. Just be sure not to bury the tape too deep—it should sit just below the soil surface.
Watering Technique: When watering your planted seed tape, use a gentle stream or watering can rather than a hose. I’ve learned this the hard way—blasting water can wash away the dissolving tape and dislodge seeds. Aim for consistent moisture without creating puddles. The goal is to dissolve the tape evenly while keeping the soil moist for those first critical 7-14 days of germination.
Staking Strategy: For long rows, I recommend working in 4-foot sections rather than the suggested 2-3 feet. This gives you more time to secure each section before moving forward. Use your stakes at the beginning and end of each section, then gently press the tape into the soil between them. This creates a more stable planting line that won’t shift when you move to the next section.
Pro Tips for Garden Seed Tape
- These simple strategies will help you get the most out of your seed tape and avoid common gardening headaches.
- Pre-Inspection Pays Off: Before planting, lay your seed tape on a flat surface and visually inspect each seed pocket....
- Soil Prep Secret: The instructions mention loosening the top 4-6 inches of soil, but here’s what I do differently: I ...
Frequently asked questions
What exactly is garden seed tape, and how does it work?
Garden seed tape is a thin, biodegradable strip pre-loaded with seeds spaced evenly apart. It’s designed to dissolve in soil, leaving seeds at the perfect depth for germination. Think of it like a DIY planting guide—no more guessing or uneven rows!
When is the best time to use seed tape?
Timing depends on your plants, but generally, use seed tape when soil temps are ideal for germination (check seed packet guidelines). For cool-season crops like lettuce or carrots, plant in early spring or fall. Warm-season veggies (tomatoes, peppers) thrive when soil is at least 60°F (15°C). Always follow your tape’s specific instructions!
Can I reuse garden seed tape, or is it single-use?
Seed tape is single-use—once planted, it dissolves or degrades in the soil. However, you can repurpose leftover tape for small containers, hanging baskets, or even DIY seed starters. Just avoid reusing it in the ground after planting!
What if my seed tape doesn’t dissolve properly?
If tape lingers above soil, it’s usually due to dry conditions or poor-quality tape. Try these fixes:
- Water thoroughly after planting to speed dissolution.
- Use biodegradable tape (avoid plastic-based options).
- Gently bury it deeper (1–2 inches) if seeds aren’t germinating.
Are there alternatives to seed tape for straight rows?
Yes! Try these DIY methods for precision planting:
- Toothpick or chopstick markers: Stick them in a straight line, then drop seeds beside them.
- String + flour: Stretch a string, sprinkle flour along it, then plant seeds in the line.
- Seedling trays: Start seeds indoors, then transplant in rows for uniformity.
Wrapping up and next steps
Garden seed tape is your secret weapon for effortless, straight rows—no more guesswork or weeding headaches! Whether you’re a beginner or a seasoned gardener, this simple tool saves time, boosts success rates, and keeps your plants thriving.
Ready to transform your garden? Start small with one row this season, and watch your confidence—and your harvest—grow!
🌱 Next step: Grab your seed tape, pick a sunny spot, and plant with precision! Need inspiration? Try herbs, flowers, or veggies—your future garden will thank you. Happy planting! 🌿