
Lawn
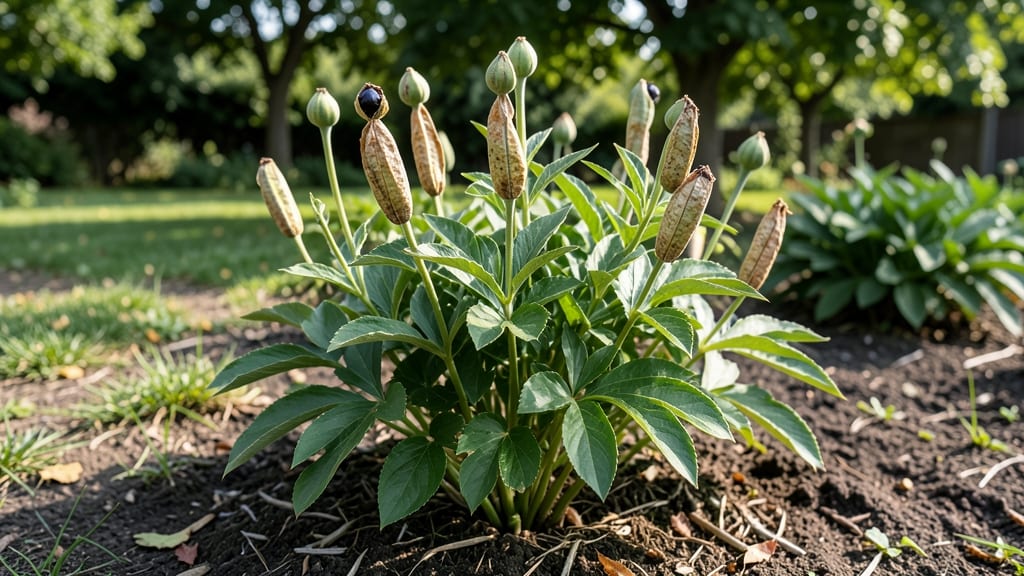
Peony seed pods hold the promise of next year’s garden—if you know how to handle them right. 🌸 Unlike most gardeners, I’ve spent years perfecting the dry-and-save method to preserve these delicate pods until spring, ensuring the seeds inside stay viable for germination.
The key? Timing, patience, and avoiding common mistakes that turn seeds to dust before they ever sprout.
First, identify mature pods—they’ll turn from green to a papery brown and split open naturally. Harvest them before they release seeds into the soil, then dry them indoors for 2-3 weeks in a cool, dark place.
Once completely dry, crack open the pods to reveal tiny, wrinkled seeds that can last years if stored properly in a sealed container with silica gel.
Germination is the real test: peony seeds need cold stratification (40°F for 4-6 weeks) before planting in well-draining soil. Expect slow progress—some seeds take 2-3 years to bloom, but the wait pays off with hardy, disease-resistant plants that outperform nursery-grown peonies.
The trade-off? Seed-grown peonies may not match the vigor of divisions, but the satisfaction of growing them from scratch is unmatched.
This method works best in zones 3-8, where winters provide natural stratification. For warmer climates, mimic cold treatment with a refrigerator. Whether you’re reviving an heirloom variety or just curious about peony propagation, mastering seed pods unlocks a slower, more rewarding way to grow these classic perennials.
📚 In This Guide
- What you need
- Instructions
- Tips and common mistakes
- Wrapping up and next steps
What you need
- ● Mature peony seed pods – Harvest only fully brown, dry pods (late summer/early fall). Aim for 5–10 pods per plant, depending on size.
- ● Brown paper bags – 1–2 per plant (labeled with plant name and harvest date). Avoid plastic to prevent moisture buildup.
- ○ Newspaper or paper towels – For drying pods indoors (optional but helpful for speed).
- ● Pruning shears or sharp scissors – To snip pods cleanly from stems (sterilize with rubbing alcohol first!).
- ● Pencil or marker – For labeling bags with variety names (e.g., "Sarah Bernhardt," "Bowl of Beauty").
- ○ Small mesh bags or envelopes – Optional for storing seeds separately if you’re saving them for propagation.
- ○ Desiccant packets – Optional for sealed containers to absorb excess moisture.
- ● Wait until pods are completely dry and papery (no green or soft spots!). Harvesting too early = moldy seeds.
- ● Choose a cool, dry location (50–70°F) for storage—basements or garages work great!
- ● Ensure pods are free of pests (inspect for weevils or mold before storing).
How to dry and save peony seed pods for future plantings
Peonies reproduce slowly, but saving seed pods ensures you’ll have fresh plants for years to come.
🌿 Step 1: Identify and Harvest Mature Seed Pods
Wait until the seed pods turn a deep brown color and begin to split open naturally—this usually happens in late summer or early fall. Gently twist the pods from the stem to avoid damaging the plant. If pods are still green, they’re not ready; immature seeds won’t germinate properly.
Harvest on a dry day to prevent moisture from accelerating decay. Place the pods in a paper bag and label them with the variety name and harvest date. This ensures you’ll know exactly what you’re saving for next season.
💧 Step 2: Dry the Seed Pods Thoroughly
Spread the harvested pods in a single layer on a clean, dry surface in a well-ventilated area. Keep them out of direct sunlight, which can cause them to overheat and crack prematurely. A shaded balcony or a covered porch works well for this process.
Check the pods daily for the next 7-10 days. They’re fully dry when the outer husk feels brittle and crumbles easily between your fingers. If moisture remains, the seeds may rot before you can plant them.
✂️ Step 3: Extract and Store the Seeds
Once the pods are completely dry, carefully crack them open with your fingers or a small knife to release the seeds. Remove any debris or empty seed casings. Peony seeds are small and dark, often resembling tiny beans.
Store the clean seeds in an airtight container filled with dry silica gel or uncooked rice to absorb any remaining moisture. Keep the container in a cool, dark place—such as a refrigerator—until spring planting. This prevents mold and ensures viability for up to 6 months.
☀️ Step 4: Stratify Seeds for Better Germination
Peony seeds require cold stratification to break dormancy. In late winter, mix the seeds with a moistened potting mix in a small container. Place the container in a sealed plastic bag and refrigerate for 3-4 months at 35-40°F.
Check the seeds monthly to ensure the mix stays moist but not soggy. After stratification, sow the seeds in well-draining soil outdoors in early spring. Germination can take 2-3 years, so patience is key—young peonies grow slowly but reward you with decades of blooms.
Tips & tricks for perfect peony seed pod preservation
Mastering this process ensures your peony seeds remain viable for future plantings—here's how to avoid common pitfalls and maximize success.
Harvest Timing: The 7-10 day drying period in Step 2 is critical—don't rush it. I've learned the hard way that even slightly damp pods can develop mold. Place a small fan nearby to create gentle airflow if your space feels too humid. This maintains consistent drying without risking overheating from direct sunlight.
Storage Wisdom: When storing seeds in Step 3, I recommend using a small glass jar with a tight-sealing lid for better moisture control than plastic containers. The silica gel or uncooked rice should be replaced every 6 months to maintain its drying properties. Label each container with both the variety name and harvest date—this prevents mix-ups when you're ready to plant.
Stratification Strategy: For Step 4's cold stratification, I've found that using a standard refrigerator works perfectly at 35-40°F. Place a small thermometer inside to monitor the temperature—some fridges have cold spots that can drop below 35°F, which may harm the seeds. Check monthly and mist the potting mix only when it feels completely dry to the touch.
Pro Tips for Peony Seed Pods
- Mastering this process ensures your peony seeds remain viable for future plantings—here's how to avoid common pitfalls and maximize success.
- Harvest Timing: The 7-10 day drying period in Step 2 is critical—don't rush it.
- Storage Wisdom: When storing seeds in Step 3, I recommend using a small glass jar with a tight-sealing lid for better moisture control than plastic containers.
Frequently asked questions
Got questions about saving peony seed pods for next season? You’re not alone! Here are some of the most common queries—plus quick, easy answers to keep your garden thriving.
Are peony seed pods worth saving?
While peonies typically reproduce via division (not seeds), saving seed pods is a fun experiment for hybridizing or growing new varieties. Just know germination rates are lower than with cuttings—patience is key! If you’re after identical blooms, stick to division, but the process is rewarding for curious gardeners.
When should I harvest peony seed pods?
Wait until pods turn brown and papery (usually late summer to early fall) before harvesting. If you pick them too soon, seeds won’t mature; too late, and they’ll split open naturally. Snap pods off with fingers or small pruners—no need to rush! Store them in a dry, cool spot until planting season.
Can I use peony seed pods for anything else besides planting?
Yes! Beyond seeds, dry pods add rustic charm to dried floral arrangements or craft projects like wreaths. Their unique texture contrasts beautifully with greenery. For a bonus, crush seeds (if viable) into homemade garden fertilizer—though composting is simpler. Just avoid inhaling dust!
How do I store peony seed pods over winter?
Place pods in a paper bag (not plastic!) with a silica gel packet or rice to absorb moisture. Store in a cool, dark place (like a basement) until spring. Avoid freezing temps—humidity is the enemy! Label bags with the harvest year to track varieties.
Why aren’t my peony seeds germinating?
Peony seeds are finicky—low germination rates are normal! Try these fixes:
- Stratification: Chill seeds in moist sand for 4–6 weeks before planting.
- Freshness: Older seeds (1+ year) germinate poorly—save only the newest pods.
- Light: Some need direct sunlight to sprout; others prefer shade.
Wrapping up and next steps
Peony seed pods may seem delicate, but with the right care, you can harvest, dry, and save them for stunning blooms next season! 🌸 Whether you’re a seasoned gardener or just starting, this simple method ensures your peonies thrive year after year.
Now that you’re equipped with the knowledge, grab those pods, follow the steps, and watch your garden flourish—your future blooms will thank you!
Ready to take the next step? Try drying a few pods this fall and share your progress with fellow gardeners! 🌱