
Propagation
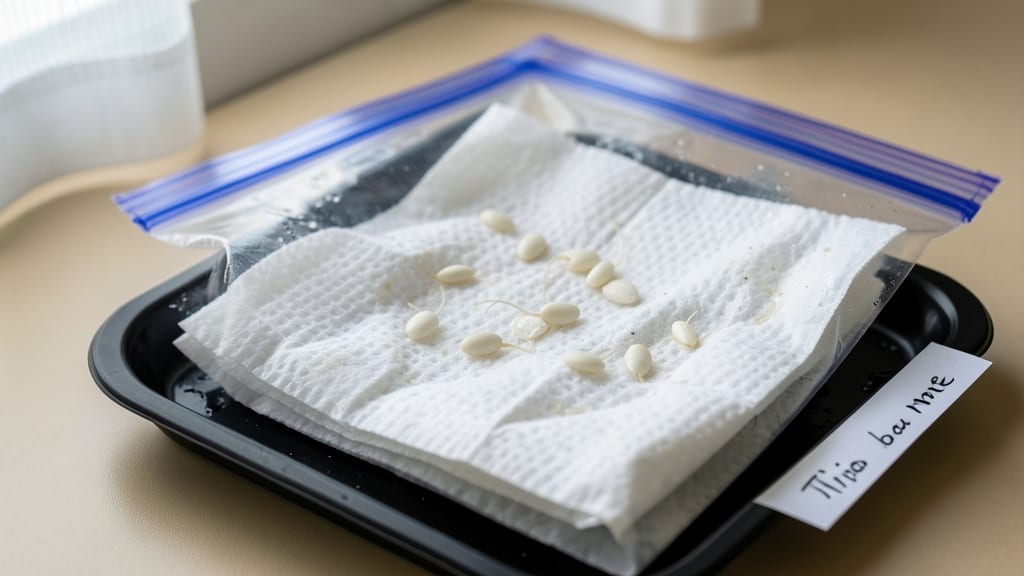
My Ziploc bag seed germination method turns a kitchen staple into a seed-starting powerhouse—no fancy equipment needed. 🌱 I’ve sprouted basil, lettuce, and even snapdragons in these bags, cutting germination time by half while using what I’d normally toss. The magic is all about moisture and warmth.
A damp paper towel inside the bag creates the perfect humid environment, while the clear plastic lets you watch roots emerge without fuss. You’ll see tiny sprouts in just 3-5 days with herbs, and 7-10 days for flowers—far faster than soil-starting.
Once those first green leaves appear, you’ll transplant delicate seedlings without shock. The method works for almost any seed, but it’s especially great for slow starters like parsley or tiny seeds that need light to germinate. Here’s the kicker: you’ll reuse the bags, reduce waste, and save space.
No more crowded seed trays or moldy damp soil. Let’s get those seeds sprouting!
📚 In This Guide
- What you need
- Instructions
- Tips and common mistakes
- Wrapping up and next steps
What you need
- ● 1–2 quart-sized ZipLoc bags (or gallon-sized for larger seeds like beans or peas). Opt for resealable, clear bags to monitor progress.
- ● 1 roll of paper towels (unbleached, to avoid chemicals). Cut into 4–6 square sheets, roughly 8x8 inches each.
- ● 1 spray bottle (8–16 oz) filled with room-temperature water (avoid tap water if it’s heavily chlorinated—let it sit out for 24 hours first).
- ● Seeds (any variety! Start with fast-sprouting options like radishes, lettuce, or basil for beginners).
- ● 1 small plate or tray (to hold the bag upright while sealing).
- ○ Optional but helpful: A permanent marker to label bags with seed type and date.
- ● 1 rubber band or twist tie for extra security if your ZipLoc isn’t sealing tightly.
- ● A warm spot (70–85°F is ideal). A seedling heat mat or sunny windowsill works great.
- ● Indirect sunlight (or a grow light if your space is dark). Avoid direct sun to prevent overheating.
- ● Patience (and maybe a timer!). Most seeds sprout in 3–14 days, depending on the type.
Step-by-Step instructions for ZipLoc bag seed germination
This method saves space, speeds up sprouting, and uses what you already have at home.
🌱 Step 1: Prepare Your Seeds and Bag
Start by placing 4-6 seeds (the servings target) between two damp paper towels. Fold the towels so the seeds are sandwiched snugly—this keeps them in contact with moisture without drowning them. I like to lay the towels flat on a clean counter first, then fold them like a letter to create neat seed packets.
Place the folded towel with seeds inside a quart-sized ZipLoc bag. Seal it tightly but leave about 1 inch of air at the top. This prevents suffocation while keeping humidity high. Give the bag a gentle squeeze to check for leaks—if water beads form on the outside, reseal it properly.
💧 Step 2: Create the Ideal Germination Environment
Place the sealed bag in a location with consistent warmth. I keep mine on top of my fridge (about 75-80°F) because it's warm, dark, and out of the way. You'll see condensation form on the bag's interior within hours—that's perfect. If no condensation appears after 24 hours, add 1 teaspoon of water to the towels and reseal.
Check daily for signs of sprouting. Most seeds will show tiny white roots or cracked seed coats within 3-7 days, depending on the variety. Avoid opening the bag until you see first true leaves (not just roots)—this prevents the delicate sprouts from drying out.
☀️ Step 3: Transition to Light and Prepare for Transplanting
Once sprouts reach about ½ inch tall and you see first true leaves, open the bag carefully. Place it in a bright, indirect light spot (no direct sun yet) for 24 hours to harden off. This gradual light exposure prevents shock and encourages sturdy growth.
After 24 hours, transfer the sprouts to small pots filled with seed-starting mix. Use a spoon to gently lift each sprout by its seed leaves, then plant it ¼ inch deep in the soil. Water lightly with a spray bottle—don’t drown the tiny roots. Keep the pots in bright, indirect light for 1 week before introducing direct sun.
⏰ Step 4: Maintain Humidity and Monitor Growth
Cover the pots with a clear plastic dome or another ZipLoc bag (with holes poked for airflow) to maintain humidity. Check soil moisture daily—it should feel damp but not soggy. If condensation forms on the dome, the humidity is perfect; if the soil dries out, mist it lightly.
Watch for first true leaves (the second set after the initial seed leaves). These indicate the plant is photosynthesizing properly. Once you see 3-4 true leaves (about 2-3 weeks after transplanting), you can remove the dome and gradually introduce more sunlight.
Tips & tricks for perfect ZipLoc bag seed germination
Here's what I learned the hard way after watching sprouts fail—these tricks make all the difference.
Moisture Management: The damp paper towels should feel like a wrung-out sponge—not dripping, not bone-dry. If condensation disappears after 24 hours, add just 1 teaspoon of water directly to the towels and reseal. Too much moisture causes rot, while too little stunts growth. I test by gently squeezing the bag—if water beads form on the outside, it's perfectly humid inside.
Light Transition Strategy: That 24-hour hardening period in Step 3 is non-negotiable. I've seen sprouts wilt instantly when moved too quickly to light. Start with just bright indirect light (like an east-facing window) and avoid direct sun for the first week. Think of it like acclimating to a new neighborhood—gradual exposure builds strength.
Seed Selection Tip: Not all seeds germinate at the same rate. Fast-sprouting varieties like radishes or lentils may show roots in 3 days, while slower seeds like chives can take up to 7 days. Check your seed packet for specific germination times—this helps you set realistic expectations and avoid prematurely opening bags.
Humidity Dome Hack: For the post-transplant stage, I use a second quart-sized ZipLoc bag with tiny holes poked in the bottom (using a toothpick). This creates a self-contained humidity chamber without the risk of suffocation. The holes allow airflow while maintaining that critical moisture level—exactly what the instructions describe for the plastic dome.
Pro Tips for Ziploc Bag Seed Germination
- Here's what I learned the hard way after watching sprouts fail—these tricks make all the difference.
- Moisture Management: The damp paper towels should feel like a wrung-out sponge—not dripping, not bone-dry. If condens...
- Light Transition Strategy: That 24-hour hardening period in Step 3 is non-negotiable. I've seen sprouts wilt instantl...
Frequently asked questions
How long do seeds stay viable in a Ziploc bag before germination?
Seeds in a humid, warm environment (like a Ziploc bag) typically germinate within 3–14 days, depending on the plant type. Once sprouted, keep them in the bag for 1–2 more days to prevent drying. After that, transplant immediately to avoid mold or root stress. Pro tip: Check daily for signs of mold (fuzzy spots)—if present, open the bag to air out!
Can I reuse the same Ziploc bag for multiple seed batches?
Yes, but sanitize it first! Wash with warm, soapy water, rinse, and let dry completely to kill bacteria/fungi. Avoid bleach—it can leave residue harmful to seeds. For extra safety, use a new bag per batch if germinating delicate seeds (like herbs or lettuce) to prevent cross-contamination.
What’s the ideal temperature for germinating seeds in a Ziploc?
Most seeds thrive between 70–85°F (21–29°C). Place the bag near a warmth source like a sunny windowsill, seedling heat mat, or even on top of a fridge (not inside—it’s too cold!). Pro tip: Use a thermometer if your climate fluctuates wildly. Cool-season crops (e.g., peas) may need slightly cooler temps (60–70°F / 15–21°C).
Why are my seeds sprouting but then turning black or mushy?
This is a fungal infection (damping-off), often caused by overcrowding, excess moisture, or poor airflow. Fix it: Immediately open the bag, remove affected sprouts, and let the bag air out for 24 hours. Reduce seed density (aim for 1–2 seeds per bag) and avoid wetting the bag’s plastic—only mist the paper towel.
Are there better alternatives to Ziploc bags for seed germination?
Try these zero-waste options:
- Reusable silicone germination pods (breathable, dishwasher-safe).
- Mason jars with a damp paper towel + lid (great for small batches).
- Bamboo seedling trays with coconut coir inserts (eco-friendly and reusable).
- DIY cloth bags (use unbleached muslin or an old T-shirt—just secure with a rubber band!).
Ziplocs are convenient, but these alternatives reduce plastic waste and often improve airflow.
Wrapping up and next steps
Using a ZipLoc bag for seed germination is a game-changer—it’s fast, efficient, and eco-friendly! 🌱 Whether you’re a seasoned gardener or a beginner, this method saves space, reduces waste, and gives your seeds the perfect head start.
With just a few simple steps, you’ll be watching tiny sprouts emerge in no time.
Now that you’re ready to sprout like a pro, take the next step! Start with a few easy-to-germinate seeds like beans or peas, then expand to your favorite herbs or veggies. Happy growing—your future garden (and the planet) will thank you! 🌍✨