
Propagation
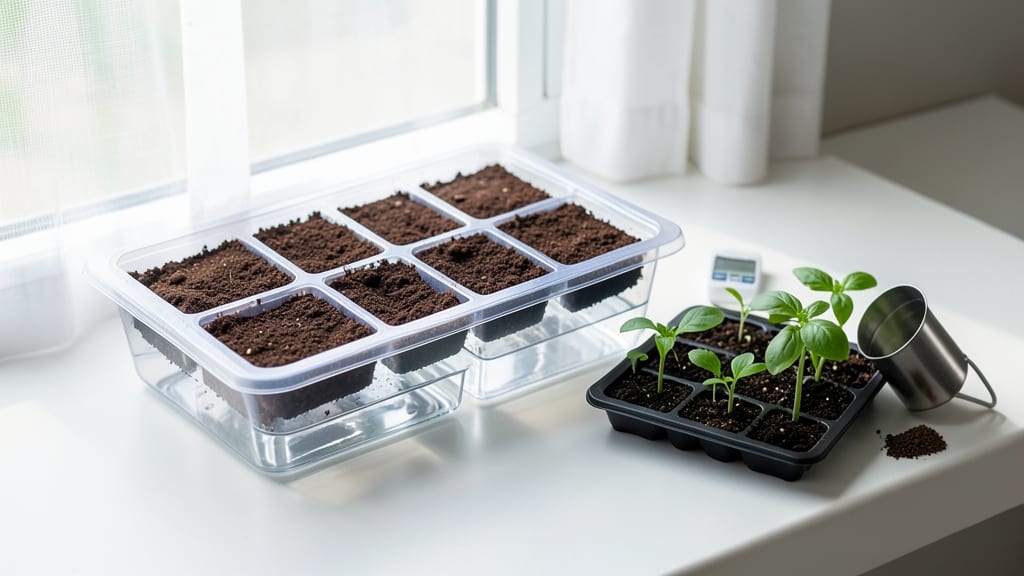
Transform your seed-starting struggles into effortless sprouting with Burpee’s self-watering system—no more guessing when to water or watching seedlings dry out. 🌱 I’ve used this setup for three seasons now, and the difference between my wilting trays of last year and these thriving seedlings is night and day.
The built-in reservoir keeps roots hydrated while preventing soggy soil, so you’re not stuck in a game of “water too much or too little.” The system’s genius lies in its simplicity: snap together the clear dome and water reservoir, fill with moistened seed-starting mix, and pop in your seeds.
No fancy tools required—just a tray, some seeds, and a few minutes of setup. You’ll spend less time fussing over moisture and more time watching those first green leaves push through the soil, which happens in 7-14 days depending on what you’re growing.
By the time you’re ready to transplant, your seedlings will be stocky, dark-green, and ready to handle the great outdoors—no leggy weaklings here. The dome creates a mini greenhouse effect, so you’ll see faster germination even in cooler months.
Plus, the clear design lets you monitor moisture levels without opening the lid (which can disrupt humidity). Perfect for beginners or anyone tired of seedling casualties. Here’s how to set it up right the first time—no more black thumbs allowed!
📚 In This Guide
- What you need
- Instructions
- Tips and common mistakes
- Wrapping up and next steps
What you need
- ● Burpee Self-Watering Seed Starting System (1 unit – includes a base tray and 12-24 individual seedling cells)
- ● High-quality seed-starting mix (1 bag, ~1-2 cubic feet – lightweight, sterile, and well-draining)
- ● Seeds (quantity depends on your plants; check seed packet spacing guidelines)
- ● Water (room-temperature, preferably filtered or rainwater)
- ● Lid or plastic wrap (to retain humidity during germination)
- ● Grow lights or sunny windowsill (12-16 hours of light daily; LED grow lights are ideal)
- ● Spray bottle (for gentle watering during germination)
- ● Tweezers or small spoon (for placing tiny seeds)
- ● Plant labels & marker (to track varieties)
- ○ Fertilizer (optional) – Use a balanced, water-soluble formula (5-10-5 or 10-10-10) diluted to half-strength after seedlings sprout)
- ○ Humidity dome (optional) – If your system doesn’t include one, a clear plastic lid works great!
- ○ Thermometer/hygrometer (optional) – To monitor ideal temps (65-75°F for most seeds)
Step-by-Step instructions for using the Burpee self-watering seed starting system
This system makes starting seeds foolproof—no more guesswork about watering or wilting. Here's how to set it up right.
🪴 Step 1: Assemble the System and Fill the Reservoir
Start by separating the bottom reservoir from the top planting tray. Fill the reservoir with water until it reaches the marked line—this ensures consistent moisture without over-saturation. I always use room-temperature water to avoid shocking the seeds later. The reservoir holds enough to keep seedlings hydrated for about 5-7 days without refilling.
Place the reservoir on a stable surface. The tray should sit snugly on top, with the wicking material (the felt-like strip) making contact with the water. If it doesn't touch, gently press the edges down until it's fully submerged. This strip is what draws water up to the soil, so proper contact is critical. You'll see the moisture rise through the tray within minutes—this is how the system works.
🌱 Step 2: Prepare the Soil and Plant Your Seeds
Fill the planting tray with seed-starting mix (the 4 cups you have) until it's about ½ inch below the rim. Press it down lightly with your fingers to remove air pockets, but don't compact it—you want it loose enough for roots to penetrate easily. The mix should feel like a damp sponge, not soggy.
Make small holes with your finger, about ¼ inch deep—roughly the width of the seed you're planting. I like to tap the seed packet gently to release one seed at a time, then drop it into the hole. Cover it with a tiny pinch of soil and label the tray with the seed type and date. This system works best with 4-6 seeds per cell, giving you options if some don't germinate.
💧 Step 3: Position for Optimal Germination Conditions
Place the assembled system in a warm spot with indirect light—a south-facing windowsill or under a grow light set to 12-14 hours daily. The ideal germination temperature is 70-75°F, so if your home runs cooler, consider using a seedling heat mat. You'll see the first sprouts in 5-10 days, depending on the seed type.
Here's the magic of this system: You won't need to water again until the reservoir is empty. The wicking action keeps the soil consistently moist without drowning the seeds. If you notice the top layer drying out faster than expected, check the wicking strip—it might not be fully submerged. A quick press down usually fixes it.
☀️ Step 4: Transition to Light and Maintain Growth
Once seedlings emerge, move them to bright, indirect light immediately. Leggy seedlings (those stretching toward the light) mean you need to raise the grow light or move them closer to the window. Strong seedlings have thick stems and dark green leaves—they'll grow this way naturally with consistent moisture.
Refill the reservoir when it's empty, but resist the urge to overfill. The tray should never sit in standing water. After 2-3 weeks, when seedlings have 2-3 true leaves, you can start fertilizing lightly with a diluted liquid fertilizer (half-strength). The self-watering feature keeps nutrients distributed evenly, so you won't need to water separately.
⏰ Step 5: Harden Off and Transplant
About 2 weeks before your last frost date, begin hardening off your seedlings. Move the entire tray outside for 1-2 hours the first day, gradually increasing time over 7-10 days. This acclimates them to outdoor conditions without shocking their roots. The self-watering system makes this easier—you won't have to worry about drying out during the process.
When transplanting, gently remove the seedlings from the tray. The cells are biodegradable, so you can plant them directly into the soil. Water deeply after transplanting to help them establish. If you notice any wilting in the first few days, it's normal—they're adjusting to their new home. The Burpee system gives them a strong start, so they'll bounce back quickly.
Tips & tricks for perfect seed starting with the Burpee system
Here's what nobody tells you about getting the most out of your seed starting setup.
Wicking Material Check: After filling the reservoir in Step 1, press down firmly on all four corners of the planting tray to ensure the wicking strip makes full contact with the water. I've seen seedlings fail because just one corner wasn't submerged—this creates dry spots that prevent germination. Test it by lifting the tray slightly after assembly; if water doesn't immediately rise through the soil, press again until it does. This ensures consistent moisture throughout the entire tray.
Soil Depth Matters: When filling the planting tray with your 4 cups of seed-starting mix in Step 2, aim for that ½ inch below the rim measurement—but don't pack it down. Gently fluff the soil with your fingers to create tiny air pockets that help roots establish. Too much packing creates compaction that roots can't penetrate, while too little soil leaves room for seedlings to topple as they grow. Think "light as a cloud" rather than "firm like a brick."
Light Positioning Secret: For the 12-14 hours of daily light in Step 3, position your grow light just 2-3 inches above the seedlings. Too high and they'll stretch (leggy seedlings), too low and they'll burn. I adjust the height every few days as they grow—this creates strong, stocky plants. Watch for leaves that turn pale yellow toward the light; that's your cue to raise it immediately. The goal is even, golden-green leaves all around.
Fertilizer Timing: Wait for those 2-3 true leaves before fertilizing in Step 4—this gives seedlings time to establish roots without the stress of nutrients. When you do fertilize, use half-strength solution and apply it directly to the reservoir water. The wicking system distributes it evenly, so you won't need to water separately. Over-fertilizing at this stage can burn tender roots, so start conservative and increase gradually as plants mature.
Pro Tips for Burpee Self Watering Seed Starting System
- Here's what nobody tells you about getting the most out of your seed starting setup.
- Wicking Material Check: After filling the reservoir in Step 1, press down firmly on all four corners of the planting tray to ensure the wicking strip makes full contact with the water.
- Soil Depth Matters: When filling the planting tray with your 4 cups of seed-starting mix in Step 2, aim for that ½ inch below the rim measurement—but don't pack it down.
Frequently asked questions
Got questions about the Burpee Self-Watering Seed Starting System?
You’re not alone! Here are answers to the most common ones to help you get started with confidence.
How does the self-watering feature actually work?
The system uses a reservoir at the bottom to store water, which slowly wicks upward through a wicking mat or felt layer to keep the soil consistently moist. You just need to fill the reservoir every few days—no more guessing or overwatering! The design ensures roots stay hydrated while preventing soggy soil or fungal growth.
When is the best time to start seeds in this system?
Timing depends on your plants! For most vegetables (like tomatoes, peppers, or herbs), start seeds 6-8 weeks before the last frost. Check your local frost dates and refer to Burpee’s seed packet guidelines—this system works year-round, but indoor lighting matters if you’re starting early. Pro tip: Use a grow light if natural light is limited!
How often do I need to refill the water reservoir?
Frequency depends on humidity, temperature, and plant type. Generally, refill every 3-5 days for most seeds. Monitor the soil—if the top inch feels dry, it’s time to add water. Overfilling can cause root rot, so aim for ¾ full to leave room for air circulation. Hotter climates may require more frequent checks!
Can I reuse this system for multiple planting seasons?
Yes! Clean the tray and reservoir thoroughly after each use to prevent mold or bacteria buildup. Scrub with a mild soap solution, rinse well, and let dry completely. Store in a dry place until your next planting session. Some gardeners even repurpose them for propagating cuttings or growing microgreens!
What should I do if my seedlings look leggy or weak?
Leggy seedlings usually mean they’re stretching for light. Move the tray to a sunnier spot or adjust your grow light closer (12-16 inches away). Thin crowded seedlings if needed, and ensure the soil stays moist but not waterlogged. If growth is still poor, check for overcrowding or nutrient deficiencies—Burpee’s system supports healthy roots, but balance is key!
Wrapping up and next steps
The Burpee Self-Watering Seed Starting System makes growing your own plants a breeze—no more guesswork about watering or drowning seedlings! 🌱 With its built-in moisture control, you’ll enjoy healthier starts and higher success rates, whether you’re a beginner or a seasoned gardener.
Ready to level up your gardening game? Grab your system, follow the steps, and watch your seeds transform into thriving plants. Next up: Explore Burpee’s seed varieties or dive into transplanting tips—your green thumb journey is just beginning!