
Planting
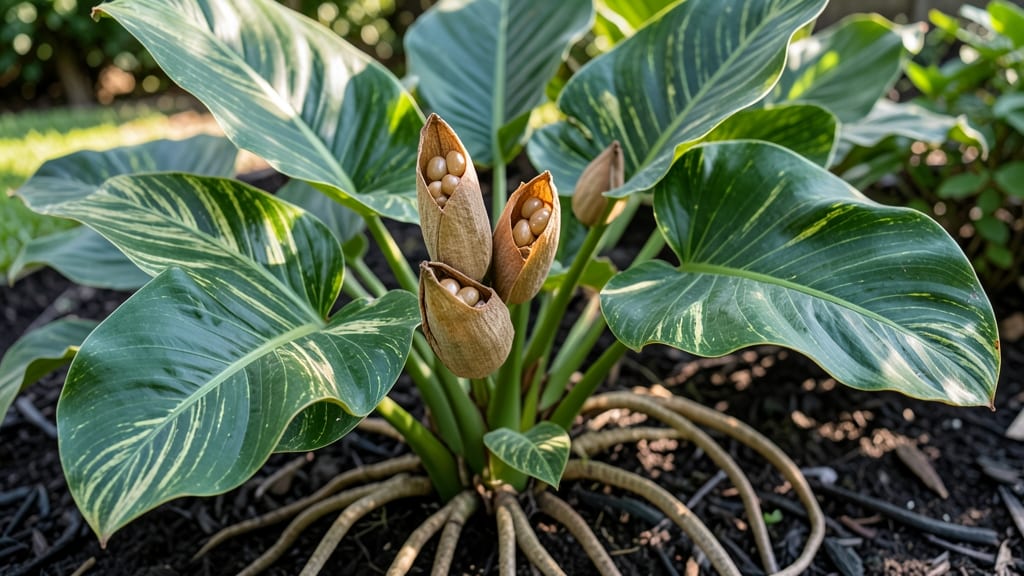
Those plump, papery canna plant seed pods hold the secret to next year’s boldest blooms—if you handle them right. 🌿 I’ve learned the hard way that drying them too fast or storing them wrong means wasted potential, but with the right steps, you’ll have healthy seedlings ready by spring.
The key is patience: let nature do most of the work while you time the harvest perfectly.
First, you’ll need just a few simple supplies: a sharp knife or scissors, paper bags for airflow, and a cool, dark spot for storage.
Once the pods turn brown and start splitting open on their own, that’s your cue to collect them—don’t rush it, or the seeds inside won’t be ready. A single pod can yield dozens of seeds, but only the freshest will sprout reliably.
With proper drying and storage, you’ll see those first green shoots in just 2-4 weeks, and by summer you’ll have cannas thriving in your garden—often bigger and more vibrant than nursery plants.
The best part? You’ll save money and get exactly the colors and sizes you love, year after year.
Whether you’re a first-timer or a seasoned grower, this method works for any canna variety, from dwarf types to towering giants. The only real challenge is waiting—so grab a notebook and start tracking your pods now. You’ll thank yourself when those first blooms appear next season.
📚 In This Guide
- What you need
- Instructions
- Tips and common mistakes
- Wrapping up and next steps
What you need
- ● Fresh canna seed pods: Harvest when pods turn brown and dry on the plant (aim for at least 20-30 pods for a reliable yield).
- ● Paper bags or brown lunch bags: 10-15 bags (one per 2-3 pods to allow airflow).
- ● Twine or rubber bands: For sealing bags (ensure they’re breathable!).
- ● Drying tray or flat surface: Cover with 1-2 layers of newspaper or parchment paper for easy cleanup.
- ● Permanent marker or labels: To mark pods with the harvest date and variety (e.g., "Canna ‘Striped’ – Oct 2023").
- ● Air-tight containers: 1-2 glass jars or resealable plastic bags with silica gel packets (for long-term storage).
- ● Pruning shears or scissors: For cleanly snipping pods from stems.
- ○ Fine-mesh strainer (optional but helpful): To sift seeds from dried pods if desired.
- ● Desiccant packets: Place 1-2 in storage containers to absorb excess moisture.
- ● Humidity monitor: Ideal for tracking storage conditions (30-40% humidity is perfect!).
- ● Labeling template: Pre-print tags with variety names and dates to save time.
- ● Small fan: For pods drying in a warm, low-humidity area (accelerates the process!).
Step-by-step blueprint for harvesting, drying, and storing canna seed pods
Here’s how I preserve canna seed pods so they stay viable until next spring’s planting.
🌱 Step 1: Harvest Seed Pods at Peak Ripeness
Wait until the pods turn a deep, papery brown and begin splitting open naturally—this usually happens in late fall after the first frost. Gently twist the pods from the stem to avoid damaging the seeds inside. If pods are still green, leave them on the plant; they won’t produce viable seeds.
I like to harvest on a dry, sunny morning when the pods are fully mature but before they burst open and scatter seeds. Place them in a single layer on a tray lined with newspaper to catch any seeds that might fall out during handling. Avoid washing them—moisture speeds up spoilage.
💧 Step 2: Dry the Pods Thoroughly in a Controlled Environment
Spread the harvested pods in a well-ventilated area with 60-70°F temperatures and indirect light. A covered porch or a sunny windowsill works well, but avoid direct sunlight, which can overheat and dry them too quickly. Turn the pods every 2-3 days to ensure even drying.
You’ll know they’re ready when the pods feel light, brittle, and crumble easily between your fingers. This usually takes 10-14 days, depending on humidity. If mold appears, dry them faster by moving to a warmer, drier spot—mold means lost seeds.
✂️ Step 3: Extract and Clean the Seeds
Once fully dry, crack open each pod with your fingers or a small knife to release the seeds. Store the empty pods in a labeled paper bag if you want to save them for next year’s planting reference. Remove any debris or chaff by sifting the seeds through a fine mesh strainer or gently blowing on them.
I store the seeds in a small envelope labeled with the variety and harvest date. Keep them in a cool, dark place until you’re ready to plant—this prevents premature sprouting and maintains viability. If you notice any seeds shriveled or discolored, discard them immediately.
🪴 Step 4: Store Seeds for Optimal Germination Next Season
Place the cleaned seeds in a sealed container with a desiccant packet (like silica gel) to absorb excess moisture. A small glass jar or airtight plastic bag works well. Store the container in a cool, dark place, such as a refrigerator or root cellar, where temperatures stay between 35-45°F.
Canna seeds can remain viable for 2-3 years under these conditions, but I always plant them within a year for the best germination rates. Label the container with the harvest date—older seeds may take longer to sprout or produce weaker plants.
⏰ Step 5: Prep for Spring Planting
In early spring, remove the seeds from storage and let them sit at room temperature for 1-2 weeks to acclimate. Soak them in lukewarm water for 12 hours before planting to soften the outer coating and encourage faster germination. Plant them 1 inch deep in well-draining soil and keep the soil consistently moist until sprouts appear.
Here’s the thing—I’ve found that pre-soaking and a warm starting environment (75-80°F) give canna seeds the best chance to break dormancy. Watch for sprouts in 2-4 weeks, and thin seedlings to the strongest one per pot if you’re growing in containers.
Tips & tricks for perfect canna seed pod preservation
These small details make all the difference when saving your canna seeds for next season.
Harvest Timing: The 2-3 day window between when pods turn papery brown and when they burst open is critical. I’ve learned the hard way that harvesting too early means immature seeds, while waiting too long means scattered seeds everywhere. Aim for that perfect moment when pods are fully brown but still intact—this usually happens within 48 hours after the first frost when temperatures drop below 40°F.
Drying Conditions: Maintaining that 60-70°F range during drying is non-negotiable. I’ve had mold ruin entire batches when humidity crept above 60%, so I always check my local weather forecast and bring pods indoors if rain is predicted. A small fan circulating air around the pods speeds up drying while preventing mold—just keep it on low to avoid blowing seeds around.
Seed Cleaning Strategy: After cracking open the pods, I use a clean white paper towel to spread the seeds and debris. The contrast makes it easy to spot and pick out any discolored or shriveled seeds before they contaminate the good ones. This step takes just a few minutes but saves hours of germination frustration later. For extra cleanliness, I use a soft paintbrush to gently sweep seeds into piles.
Storage Environment: The 35-45°F range in your refrigerator’s crisper drawer is ideal for long-term storage. I’ve found that adding a small packet of silica gel to the container extends viability by absorbing any moisture that might sneak in. Label each container with the harvest date—this helps you track how long seeds have been stored and when to prioritize planting them for best results.
Pro Tips for Canna Plant Seed Pods
- These small details make all the difference when saving your canna seeds for next season.
- Harvest Timing: The 2-3 day window between when pods turn papery brown and when they burst open is critical.
- Drying Conditions: Maintaining that 60-70°F range during drying is non-negotiable.
Frequently asked questions
Got questions about harvesting, drying, or storing canna plant seed pods? You’re not alone! Here are the most common queries—plus clear answers to keep your seeds viable for next season’s garden showstoppers.
How do I know when canna seed pods are fully ripe and ready to harvest?
Seed pods are ready when they turn dry, papery, and brown—like crinkly brown paper bags. Gently press a pod: if it crumbles easily (not mushy), it’s time to harvest! Avoid harvesting green pods, as seeds inside won’t germinate. Pro tip: Morning harvests prevent overnight humidity damage.
How long does it take for canna seed pods to dry indoors?
With proper airflow, pods dry in 1–3 weeks. Place them in a well-ventilated spot (like a mesh bag or open tray) away from direct sunlight or heat sources. Check weekly—overdrying can shatter pods, but under-dried pods risk mold. Troubleshooting: If humidity’s high, add a silica gel packet to speed things up!
What’s the best way to store canna seeds long-term?
Store seeds in a cool (35–40°F), dark, and dry place (like a fridge or seed vault) in airtight containers with silica gel packets. Label pods with the variety and harvest date! Seeds stay viable for 2–3 years, but germination rates drop after year one. Alternative: Freeze pods in a sealed bag for up to 5 years.
Why aren’t my canna seed pods producing seeds?
Common culprits: poor pollination (hand-pollinate with a paintbrush if needed), immature plants (wait until flowers fade), or disease (check for powdery mildew). If pods form but stay green, they’re likely underripe. Fix: Ensure plants get full sun (6+ hours/day) and balanced fertilizer.
Can I save seeds from hybrid canna plants for next year?
Yes, but expect unpredictable results—hybrids may not replicate parent traits. For consistent blooms, buy fresh seeds or propagate via rhizomes. If you’re experimenting, plant extra seeds to account for variability! Fun fact: Some hybrids surprise with bolder colors or heights.
Wrapping up and next steps
Mastering the art of drying and storing canna plant seed pods ensures your garden will burst with vibrant blooms next season! 🌱 With the right tools—like proper airflow, low humidity, and airtight containers—you’re well on your way to preserving these botanical treasures.
Don’t wait until the last minute; act now to secure your future harvest.
Ready to take the next step? Mark your calendar to check on your stored pods in 3-6 months, and replant them when spring arrives. Your garden’s next masterpiece starts with these tiny seeds—happy growing! 🌸