
Lawn
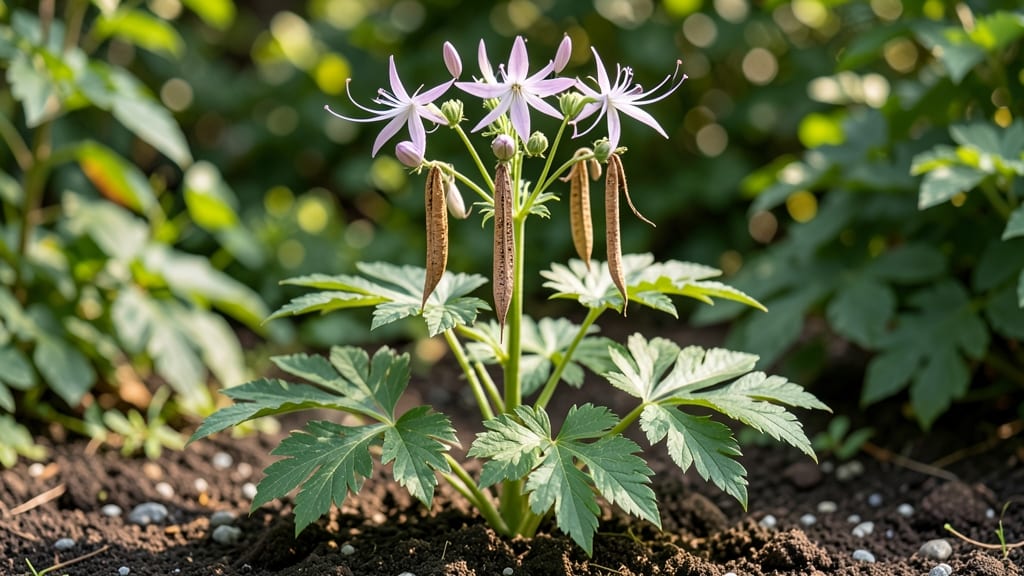
Those iconic cleome seed pods are nature’s way of saying, "Save me for next year!" 🌿 The key to harvesting viable seeds lies in timing—wait until the pods turn brown and start splitting open, but act fast before the seeds scatter.
I’ve learned the hard way that letting them twist and pop on the plant means losing half your seeds to the wind or birds.
Grab a pair of pruning shears and snip the pods when they’re fully mature but still dry. Lay them on a screen or paper towel in a dry, shaded spot for 2-3 weeks—this lets the pods finish opening naturally.
Store the seeds in a cool, dark place until spring, and you’ll have a head start on next season’s spider flower display.
Once dried, gently rub the pods between your fingers to release the seeds. A single cleome plant can yield 50-100 seeds, so you’ll have plenty to share or replant.
The best part? These seeds stay viable for 2-3 years, making them a gardener’s secret weapon for free, homegrown blooms.
For those with limited space, cleome seeds are perfect for succession planting—sow a few every 2-3 weeks in spring for a continuous cascade of flowers. Just avoid overcrowding, or you’ll spend summer untangling vines instead of admiring them. Happy harvesting!
📚 In This Guide
- What you need
- Instructions
- Tips and common mistakes
- Wrapping up and next steps
What you need
- ● Mature cleome plants: Ensure pods are fully brown and dry (usually late summer/fall). Aim for at least 3-5 healthy plants for a good seed yield.
- ● Pruning shears or sharp scissors: 1 pair (sterilized with rubbing alcohol to prevent disease spread).
- ● Paper grocery bags or breathable seed-saving envelopes: 5-10 bags (label each with the cleome variety and harvest date).
- ● Permanent marker or masking tape + pen: For labeling pods/bags.
- ● Flat drying surface: A clean screen, wire rack, or cardboard tray (avoid plastic to prevent moisture bucketing).
- ● Fine-mesh sieve or colander: 1 (for separating seeds from chaff during processing).
- ○ Small fan or well-ventilated space: To speed up drying (optional but helpful in humid climates).
- ● Desiccant packets: Place 1-2 in seed bags to absorb excess moisture during storage.
- ● Glove box or sealed container: For long-term seed storage (aim for 50°F or cooler and 30-40% humidity).
- ● Digital scale: To measure seed weight (helpful for tracking viability over time).
- ● Camera or notebook: To document pod stages or seed color variations for future reference.
How to harvest cleome seed pods without twisting them
Here's the simple method I use to collect cleome seeds without the annoying twist—no gloves or tools needed.
🌿 Step 1: Identify Mature Seed Pods
Wait until the cleome seed pods turn from green to a dry, papery brown color—this usually happens in late summer or early fall, depending on your climate. The pods will feel crispy and light when you touch them, almost like dried paper. Avoid harvesting when they're still green or slightly yellow, as the seeds inside won't be fully developed.
Look for pods that are fully elongated and have split slightly at the seams. If you see tiny black seeds spilling out when you gently shake the pod, it's ready. I like to harvest on a dry, sunny morning because the pods stay firm and less likely to crumble in my hands.
💧 Step 2: Prepare for Gentle Handling
Before you start, place a clean white towel or sheet of newspaper on a flat surface—this will catch the seeds and keep them from rolling away. I find that working outdoors on a picnic table makes this easier, especially if you're harvesting multiple plants. Wear old clothes or an apron, as cleome seeds can be messy and stain easily.
Moisten your hands slightly with water or rub them together to create a tiny bit of friction. This prevents the pods from slipping out of your grasp while you work. The goal is to handle the pods gently but firmly—cleome pods are delicate and can shatter if squeezed too hard.
✂️ Step 3: Harvest Without Twisting
Grasp the pod firmly near the base, where it attaches to the stem. Instead of twisting, which can cause the pod to snap or the seeds to scatter, gently pull downward with a slight rolling motion. Think of it like unscrewing a jar lid—you're guiding the pod off the stem rather than forcing it. Most pods will release cleanly with just a little pressure.
If a pod resists, don’t tug harder. Instead, wiggle it gently side to side while pulling downward. This helps loosen the pod without damaging it. Place each harvested pod directly onto the towel or newspaper. Once all the pods are collected, let them dry for an additional 24 hours in a warm, dry spot to ensure any remaining moisture evaporates.
🪴 Step 4: Extract and Store the Seeds
After the pods are fully dry, lay one on its side and gently press the sides together with your thumbs. The pod will split open like a tiny paper envelope, releasing the seeds inside. I like to do this over the towel so any stray seeds don’t get lost. The seeds will look like tiny, dark brown beads—each one capable of growing a new cleome plant next year.
Transfer the seeds to a small envelope or airtight container. Label it with the date and variety (if you have multiple types). Store the seeds in a cool, dry place, like a pantry or seed drawer. Cleome seeds can remain viable for up to three years, so there’s no rush to plant them right away.
⏰ Step 5: Clean Up and Prevent Scattering
Once all the pods are harvested and seeds are stored, sweep up any remaining seeds or pod fragments from your work surface. Cleome seeds scatter easily, and you don’t want them sprouting in unwanted places. If you notice any seeds still clinging to the stems of your cleome plants, gently brush them off and add them to your storage container.
After harvesting, give your cleome plants a light trim to encourage any remaining flowers to set seed. This ensures you get the most seeds possible from each plant. If you’re growing cleome as an annual, you can also pull up the plants once they’ve finished producing seeds—just be sure to compost them or dispose of them properly to avoid accidental reseeding.
Tips & tricks for perfect cleome seed harvesting
These simple tricks will help you collect every last seed without the frustration of broken pods or lost harvests.
Timing is Everything: Harvest cleome pods on a dry, sunny morning when they're completely dry and crispy. I've learned the hard way that damp pods crumble when handled, so avoid harvesting after rain or in the evening when dew forms. The 24-hour drying period after harvesting is crucial—this ensures any remaining moisture evaporates completely, making the pods easier to handle and preventing mold.
The Gentle Touch Technique: In Step 3, when you're pulling pods from the stem, think of it like removing a screw from a jar—slow and steady wins the race. I've ruined entire batches by twisting too hard, which causes the pods to explode and seeds to scatter everywhere. The wiggle-and-pull method preserves the pod structure while releasing it cleanly from the stem. This technique works especially well for larger cleome varieties where the pods can be quite brittle.
Pod Preservation: After harvesting, spread the pods out on a single layer in a warm, dry spot for that full 24 hours. I use a mesh produce bag or a paper towel-lined tray to allow air circulation. This prevents moisture buildup that could lead to mold. The extra drying time also helps the pods become more pliable for easy seed extraction—you'll notice they'll split open with just a gentle thumb press rather than requiring force.
Seed Collection Strategy: For maximum yield, harvest pods when they've just started splitting naturally. I've found that pods which have already split open often have seeds that have already dispersed, while pods that are still completely closed may not be fully mature. The sweet spot is when you see those tiny black seeds peeking out when you give the pod a gentle shake. This timing ensures you capture seeds at their peak viability.
Pro Tips for Cleome Seed Pods
- These simple tricks will help you collect every last seed without the frustration of broken pods or lost harvests.
- Timing is Everything: Harvest cleome pods on a dry, sunny morning when they're completely dry and crispy. I've learne...
- The Gentle Touch Technique: In Step 3, when you're pulling pods from the stem, think of it like removing a screw from...
Frequently asked questions
about cleome seed pods—because even the most experienced gardeners have curiosities! Here’s what you need to know before harvesting those iconic "spider flower" pods.When is the best time to harvest cleome seed pods?
Harvest cleome seed pods when they turn dry and papery, usually 4–6 weeks after flowering. If left too long, they’ll split open and scatter seeds prematurely. Aim for late summer to early fall for the best viability.
Why do cleome seed pods sometimes split open before I can collect them?
This happens when pods are overripe or exposed to rain/humidity. To prevent it, harvest pods before they turn brown or use mesh bags to contain them on the plant. If they’ve already split, check the soil—you might find scattered seeds ready to sprout!
Can I save cleome seeds from store-bought flowers?
Yes! If your cleome was grown from open-pollinated seeds (not hybrid), save the pods and follow the same drying/harvesting steps. Just note the variety—store-bought hybrids may not produce true-to-type offspring.
How do I store cleome seeds for next year?
Once dry, remove seeds from pods and store them in a cool, dry place (like a sealed envelope or jar). They’ll stay viable for 2–3 years. For extra protection, refrigerate them in a paper bag with a silica packet.
What if my cleome pods develop mold or pests?
Discard moldy or insect-damaged pods immediately—they won’t produce healthy seeds. To prevent issues, harvest pods early and avoid overcrowding plants. If pests (like aphids) are a problem, use neem oil as a natural deterrent.
Wrapping up and next steps
From understanding the unique structure of cleome seed pods to mastering twist-free harvesting techniques, you’re now equipped to save those seeds for next year’s garden! 🌱 These vibrant blooms don’t just add color—they’re a low-cost, rewarding way to expand your garden naturally.
Ready to put your new skills to use? Grab those pods, follow the steps, and get growing! Share your success (or ask questions!) in the comments—happy gardening!