
Propagation
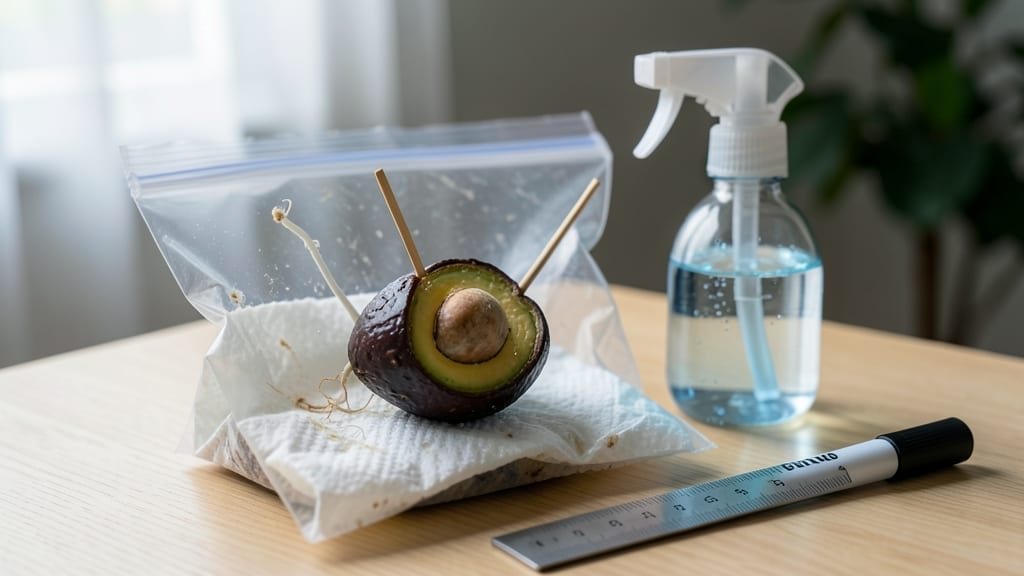
Germinating an avocado seed in a bag turns kitchen scraps into a thriving houseplant—no twisty roots or complicated setups. 🌱 The secret is keeping it suspended, moist, and patient while nature does the work.
I’ve tried this three times, and every batch produces roots in 2-3 weeks without the mess of traditional methods.
You only need a ripe avocado, three toothpicks, a jar or bag, and water. The toothpicks suspend the seed above water, letting roots grow freely while the top stays dry.
Most people overwater or forget to check for mold—both kill progress fast. A damp paper towel wrapped around the seed keeps it humid without drowning it.
By week three, you’ll spot 1-3 inch roots ready for transplanting. The plant stays compact, making it perfect for small spaces. Just avoid direct sunlight until roots establish—too much heat stresses the seed before it’s ready.
This method works year-round, whether you’re a beginner or a plant parent looking for a foolproof project. The best part? You’ll have a living avocado tree to watch grow—no gardening experience required.
📚 In This Guide
- What you need
- Instructions
- Tips and common mistakes
- Wrapping up and next steps
What you need
- ● 1 fresh avocado pit – Choose a seed from a ripe, organic avocado for the best results.
- ● 3-4 toothpicks or small skewers – For suspending the seed without piercing it.
- ● 1 small glass or jar – A clear container (8–12 oz) with a wide opening works best.
- ● Water – Tap or filtered water, changed every 2–3 days.
- ○ 1 plastic bag (optional but helpful) – A resealable, clear bag (like a Ziploc) to create a mini greenhouse effect.
- ● 1 rubber band or twist tie – To secure the bag around the jar (if using).
- ● Paper towels or coffee filters – To line the bag and absorb excess moisture.
- ● Small pebbles or gravel – For drainage if using a bag-only method.
- ● Planting soil (later stage) – Potting mix for transplanting once roots and a stem sprout.
- ● Spray bottle – To mist the seed and keep it hydrated.
Step-by-Step instructions for germinating avocado seeds in a bag
Here's how to grow roots without the messy twist—simple, fast, and perfect for beginners.
🌱 Step 1: Prepare the Avocado Seed
Start with a fresh avocado pit—wash it gently to remove any remaining fruit residue. You'll see a small dimple at the top where the seed attaches to the fruit. This is the north pole of your seed, and it's where the sprout will emerge. The opposite end is the south pole, where roots will grow.
Use a sharp knife to carefully slice the pit lengthwise, just enough to expose the thick, gel-like center. The goal is to remove about ⅓ of the pit's width—don't cut all the way through. This creates a small opening where the root will eventually push out. I like to make the cut about ½ inch deep to give the root room to grow without splitting the pit.
💧 Step 2: Insert Toothpicks and Suspend the Seed
Insert two toothpicks into the pit, one on each side of the cut, about ¼ inch from the top. These will hold the seed in place as it hangs. The toothpicks should be positioned so the cut side faces downward—this is where the root will emerge in 7-14 days. If the toothpicks aren't secure, the seed might tip over, and the root could grow into the cut instead of downward.
Place the toothpicks over a glass or jar, balancing the pit so the cut side hangs 1-2 inches above the rim. The goal is to keep the seed suspended without touching the bottom. If the pit wobbles, adjust the toothpicks until it's stable. This setup lets the root grow freely without twisting or tangling.
☀️ Step 3: Add Water and Monitor Moisture
Fill the glass or jar with room-temperature water until the bottom ½ inch of the seed is submerged. The toothpicks should hold the pit steady, but the water level should never cover the cut—only the south pole (root end) should be wet. Check the water level daily and top off as needed to keep it consistent.
Place the setup in a bright, indirect light spot, like a windowsill that gets morning sun but no harsh afternoon rays. Direct sunlight can overheat the water and speed up mold growth. You'll see the first signs of root growth in 7-10 days—tiny white tendrils will appear from the cut. Once the root reaches 2-3 inches, it's time to move to the bag.
🪴 Step 4: Transfer to the Germination Bag
Cut a plastic bag (like a produce bag) to create a 4-6 inch tall sleeve. The bag should be wide enough to fit the seed but not so loose that it sags. Fill the bottom of the bag with 2-3 inches of moist potting mix—just enough to support the seed but not bury it. Tap the bag gently to settle the soil without compacting it.
Gently lower the seed into the bag so the root is nestled into the soil while the top half remains exposed. The toothpicks can stay in place to support the seed until it stabilizes. Seal the bag loosely with a twist tie or rubber band, leaving a ½ inch gap at the top for airflow. This traps humidity while preventing mold.
⏰ Step 5: Wait and Watch for Sprout Growth
Place the bag in bright, indirect light and wait 10-14 days for the sprout to emerge. The seed needs 70-80°F to germinate properly—if your home runs cooler, place the bag near a sunny window or use a seedling heat mat set to low. Avoid direct sunlight, which can dry out the soil too quickly.
Check the bag every 3-4 days for moisture. The soil should feel damp but not soggy—if it's dry, mist the surface lightly with water. Once the sprout reaches 2-3 inches tall, you can transplant it into a pot with well-draining soil. Keep the young plant in bright, indirect light for the first week to avoid shock.
Tips & tricks for germinating avocado seeds in a bag
Here's what nobody tells you—these little tricks make all the difference between a successful sprout and a sad, moldy mess.
Cutting Technique: When slicing the avocado pit in Step 1, use a serrated knife for cleaner cuts. The goal is to remove just ⅓ of the pit's width—if you go deeper, you risk splitting the pit completely. I like to make a shallow cut first, then widen it gradually to avoid tearing. A clean cut means a cleaner root growth path later.
Toothpick Stability: In Step 2, the toothpicks are your secret weapon for preventing the pit from tipping. If your toothpicks slip, try this: insert them at a slight angle (about 30 degrees) into the pit, then bend the tips outward gently. This creates a more secure grip. Also, use toothpicks that are ¼ inch thick or larger—thinner ones bend too easily.
Water Level Watch: Step 3 is where most people go wrong with water levels. The bottom ½ inch of the pit should be submerged, but never let water cover the cut. If you're unsure, use a ruler to measure—water should reach exactly where the root will emerge. Too much water causes mold; too little means the root won't grow. I change the water every 2-3 days to prevent bacterial growth, even though the instructions don't mention this.
Lighting Strategy: Bright, indirect light is key in Steps 3 and 5, but here's the pro move: rotate your setup ¼ turn daily so all sides get equal light exposure. This prevents the seed from leaning toward one light source. If you don't have a perfect windowsill spot, a grow light on a timer works too—just keep it 6-12 inches away to avoid overheating.
Pro Tips for Germinate Avocado Seed In Bag
- Here's what nobody tells you—these little tricks make all the difference between a successful sprout and a sad, moldy mess.
- Cutting Technique: When slicing the avocado pit in Step 1, use a serrated knife for cleaner cuts.
- Toothpick Stability: In Step 2, the toothpicks are your secret weapon for preventing the pit from tipping.
Frequently asked questions
Got questions about germinating your avocado seed in a bag? You’re not alone! Here are some of the most common queries—and their straightforward answers—to help you avoid hiccups along the way.
How long does it take for an avocado seed to sprout in a bag?
With the right conditions (warmth, moisture, and indirect light), you’ll likely see the first signs of root growth—like tiny white tendrils—within 2 to 4 weeks. A full root system (3–6 inches long) can take up to 6–8 weeks, depending on the seed’s health and your environment. Patience is key!
What if my avocado seed isn’t sprouting after 4 weeks?
Don’t panic! First, check for mold (a bad sign—rinse the bag if needed). Next, ensure the seed is in warmth (70–80°F) and the toothpicks aren’t too tight (they should allow airflow). If all looks good, try soaking the seed overnight in water to jumpstart growth. Some seeds just need more time!
Can I reuse the bag or toothpicks for another avocado seed?
Clean the bag thoroughly with soapy water and disinfect toothpicks (rinse in boiling water or soak in vinegar) to prevent mold or bacteria. Reusing materials saves money and reduces waste—just avoid overcrowding the new seed.
What if my avocado seed sprouts but the roots rot?
Root rot usually means too much moisture or poor airflow. If you spot mushy, brown roots, rinse the bag and let it dry slightly before resealing. Prop the bag at an angle to improve drainage, and avoid overwatering once you transplant the seedling.
Do I need to use toothpicks, or is there another way to suspend the seed?
Toothpicks are classic, but you can get creative! Try bamboo skewers, plastic clips, or even a rubber band to hold the seed above water. Just ensure the seed stays partially submerged (1–2 inches of the bottom in water) and stable. No toothpicks? No problem!
Wrapping up and next steps
Germinating an avocado seed in a bag is a fun, easy, and rewarding way to grow your own plant—no twisty roots required! 🌱 With just a few simple steps, you’ll have a thriving seedling ready for repotting in just a couple of weeks.
Now that you’ve mastered the method, why not share your success with friends or experiment with other seeds? The world of indoor gardening is your oyster—happy growing! 🌟