
Lawn
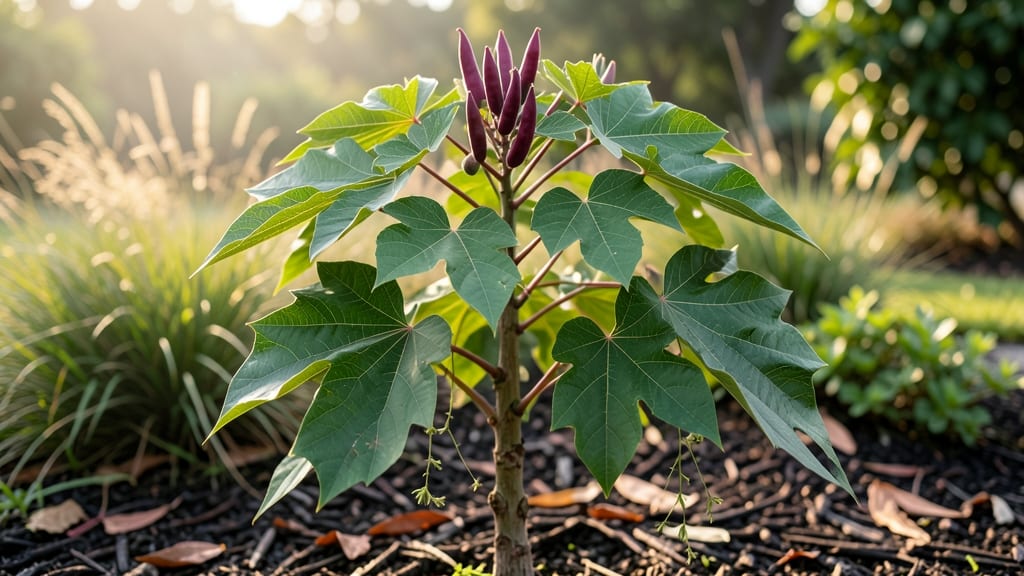
Growing castor beans from seed means harvesting those striking green pods before they explode—a race against time that rewards patience with bold, tropical drama. 🌿 I learned the hard way that these plants grow fast, but their pods crack open with alarming speed, scattering seeds everywhere.
The key is timing: you want the pods firm but still unbroken, ready for harvest before nature takes over. These plants thrive in warm climates (zones 9-11) but can be grown as annuals in cooler areas with a long growing season.
Start seeds indoors 8-10 weeks before your last frost, or direct-sow after all danger of frost has passed. They need full sun (6+ hours daily) and well-draining soil—sandy loam works best to prevent rot. Space plants 3-5 feet apart since they grow 6-10 feet tall and spread wide.
Once established, castor beans are surprisingly low-maintenance. Water deeply once a week (more in extreme heat) and avoid overhead watering to prevent fungal issues.
The plants handle drought surprisingly well once rooted, but consistent moisture speeds up growth. Harvest pods when they turn greenish-brown—they’ll split open within days if left too long, releasing seeds that can be toxic if ingested.
Beyond their ornamental value, castor beans have industrial uses (castor oil) and educational potential for teaching plant biology. Just remember: all parts are toxic, so wear gloves when handling and keep pets/kids away from the plants.
With the right timing, you’ll enjoy their striking foliage and unique seed pods all season long.
📚 In This Guide
- What you need
- Instructions
- Tips and common mistakes
- Wrapping up and next steps
What you need
- ● Castor bean seeds (Ricinus communis) – 10–20 seeds (choose a variety like ‘Zanzibarense’ or ‘Carolinian Giant’ for larger pods).
- ● Well-draining potting mix – 10–15 lbs (or a blend of 60% garden soil, 30% compost, and 10% perlite for optimal aeration).
- ● Containers or garden bed – For containers: 5-gallon pots or larger (with drainage holes).
- ● For outdoor planting: A sunny, sheltered spot with 6+ hours of sunlight daily and well-drained soil (pH 5.5–7.5).
- ● Slow-release fertilizer – Balanced 10-10-10 or 5-5-5 (1 tbsp per plant at planting).
- ● Watering can or hose with a gentle spray nozzle (castor beans hate soggy roots!).
- ● Gloves – Heavy-duty gardening gloves (castor bean leaves and seeds contain ricin, a toxin—handle with care!).
- ● Pruning shears – For trimming dead or overgrown foliage (sterilize with rubbing alcohol).
- ○ Plant supports (optional) – Stakes or cages (3–4 ft tall) to prevent pod damage from wind.
- ● Trellis for vertical growth (if space is limited).
- ○ Seed-starting tray (optional) – If germinating indoors first (use biodegradable pots to avoid transplant shock).
- ● Harvesting basket or mesh bag – To collect pods gently before they split open.
- ○ Food-safe drying rack (optional) – For curing seeds without contamination.
Step-by-step instructions for growing castor beans to harvest intact pods
Castor beans are easy to grow but tricky to harvest—here's how I ensure pods stay whole until I'm ready.
🌱 Step 1: Choose the Right Location and Plant Seeds
Castor beans thrive in full sun with at least 6-8 hours of direct light daily. They need warm soil to germinate, so wait until nighttime temperatures stay above 60°F. I plant seeds 1 inch deep and 12 inches apart in well-draining soil—castor beans hate soggy roots.
Here's the thing—castor beans grow fast but need space. If you crowd them, the plants compete for nutrients and produce fewer pods. I always space mine wider than the instructions suggest because the leaves spread more than you'd expect.
☀️ Step 2: Support Plants and Monitor Growth
When seedlings reach 4-6 inches tall, I install sturdy stakes or a trellis system. Castor bean pods grow heavy, and unsupported plants can snap under the weight. I use 3-foot bamboo stakes tied loosely with soft twine—tight knots can damage the stems as they grow.
Watch for first flower buds about 6-8 weeks after planting. These plants grow aggressively, so I check them weekly. The flowers are striking but short-lived—pods form quickly after pollination, and that's when the race to harvest begins.
⏰ Step 3: Time Harvests for Peak Maturity
Pods mature in 3-4 months after planting, but here's the critical part: they crack open when fully ripe, spilling seeds everywhere. I harvest when pods turn brown but remain firm to touch—this is the 30-40 days after flowering window.
Use sharp pruning shears to cut the entire pod stem cleanly. Never pull pods off—they'll crack immediately. I work in the early morning when temperatures are cooler, which slows the drying process and keeps pods intact longer.
🌿 Step 4: Cure and Store Harvested Pods
Spread harvested pods in a single layer on a screen or mesh tray in a dry, shaded area for 1-2 weeks. This slow drying prevents mold while allowing seeds to fully mature inside. I check daily—if pods feel soft or develop dark spots, they're overripe and should be processed immediately.
Once completely dry, store pods in airtight containers with a silica gel packet to absorb moisture. Properly cured pods stay viable for 2-3 years. I label each container with the harvest date because even with perfect storage, seed quality declines over time.
✂️ Step 5: Prevent Premature Pod Cracking
If you miss the harvest window, pods will crack open naturally. To salvage seeds, collect them immediately and dry on paper towels for 24 hours before storage. I've had success with cracked pods by processing seeds this way, though germination rates drop slightly.
For next year, consider growing castor beans in containers if space is limited—they still produce pods but are easier to monitor. I've found container-grown plants ripen slightly slower, giving me more time to harvest before pods crack open.
Tips & tricks for perfect castor bean harvesting
These simple strategies will help you avoid the common pitfalls of castor bean harvesting and keep those pods intact until you're ready.
The Planting Spacing Secret: While the instructions call for 12 inches between seeds, I recommend stretching that to 18 inches if you're growing in loose, nutrient-rich soil. The extra space gives roots room to establish before the aggressive growth phase begins. I learned this the hard way after watching plants lean toward each other like drunk friends at a party—crowded plants produce fewer pods and weaker stems.
Harvest Timing is Everything: That 30-40 day window after flowering is your golden opportunity, but here's what nobody tells you—morning is the only time to work. Cooler temperatures slow the drying process, giving you more time to harvest without pods cracking. I set my alarm for sunrise because those pods can go from firm to split open in just a few hours once they reach peak ripeness. The brown color is your cue, but firmness is the real test.
Curing Strategy: The 1-2 week drying period is crucial, but don't just toss pods on any surface. Use a screen or mesh tray with good airflow underneath—this prevents mold from forming on the bottoms while they dry. I hang mine from a clothesline in my garage with a fan blowing gently nearby. This creates a controlled drying environment that's faster than air-drying alone. Check daily for soft spots or darkening, which means they've over-ripened and should be processed immediately.
Equipment Upgrade: Skip the basic pruning shears and invest in a pair of sharp, heavy-duty harvest scissors. The clean cut prevents stem damage that can trigger premature cracking. I use my grandfather's old Felco pruners—yes, they cost more, but they last decades and make the harvest process 10 times easier. The key is to cut the entire stem cleanly about 1 inch above the pod. This small detail makes all the difference when you're dealing with dozens of plants.
Pro Tips for Seed Castor Bean
- These simple strategies will help you avoid the common pitfalls of castor bean harvesting and keep those pods intact until you're ready.
- The Planting Spacing Secret: While the instructions call for 12 inches between seeds, I recommend stretching that to 18 inches if you're growing in loose, nutrient-rich soil.
- Harvest Timing is Everything: That 30-40 day window after flowering is your golden opportunity, but here's what nobody tells you—morning is the only time to work.
Frequently asked questions
Got questions about growing and harvesting seed castor beans? You’re not alone! Here are answers to the most common concerns—from timing to troubleshooting—to help you succeed with this unique plant.
When is the best time to harvest seed castor bean pods?
Harvest pods when they’re firm but slightly soft—usually 60–90 days after planting, depending on your climate. Wait too long, and they’ll crack open and release seeds prematurely. Morning harvests work best when pods are dry from the night air.
What do I do if my castor bean pods crack open before I harvest?
Don’t panic! If seeds spill, collect them immediately—they’re still viable for 1–2 weeks if kept dry. For next time, prune lower pods first to focus energy on upper ones, or use mesh bags over clusters to delay cracking.
Can I grow seed castor beans in containers, or do they need a garden bed?
Yes! Castor beans thrive in large containers (15+ gallons) with well-draining soil. Just ensure pots get full sun (6+ hours/day) and deep watering 2–3 times weekly. Containers work well in urban areas, but expect slightly smaller plants than in-ground.
What’s the fastest way to dry castor bean seeds after harvest?
Spread pods/seeds in a single layer on a screen or paper towel in a well-ventilated, dry area (60–70°F). Avoid direct sunlight—it can overheat seeds. With good airflow, drying takes 1–2 weeks. Store dried seeds in airtight containers away from moisture.
Are there non-toxic alternatives to castor beans for seeds or oil?
If you’re avoiding castor beans due to toxicity (they’re highly poisonous raw), try:
- Sunflower seeds (edible, high in oil)
- Flaxseeds (omega-3 rich, safe for birds)
- Jojoba seeds (non-toxic, used for oil)
Wrapping up and next steps
Growing seed castor beans can be a rewarding experience, especially when you master the art of harvesting those prized pods before they crack open! 🌱 With the right tools, timing, and techniques—like monitoring moisture levels and using sharp pruners—you’ll unlock a bountiful harvest for gardening, crafts, or even eco-friendly projects. Don’t let those seeds escape—stay patient and proactive!
Ready to take the next step? Experiment with different harvesting methods or share your castor bean journey with fellow gardeners. Every pod you save is a win for sustainability and creativity! 🌟