
Lawn
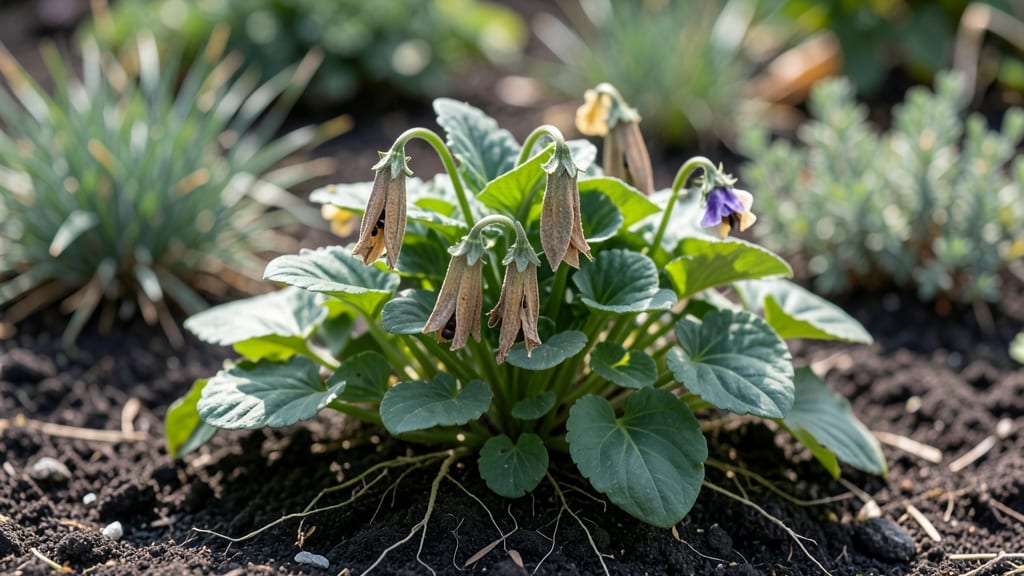
Harvesting pansy seed pods before they twist into the ground saves you money and guarantees next spring’s brightest blooms. 🌸 I’ve learned the hard way that skipping this step means store-bought pansies every year—until I cracked the code on collecting, drying, and storing these little treasure pods.
The secret starts with patience: wait until the pods turn from green to brown but haven’t split open yet. A gentle twist (not a yank!) releases the seeds inside, and you’ll avoid the messy, moldy aftermath that ruins whole batches.
Most gardeners overlook humidity control—too dry, and seeds shatter; too damp, and mold takes over.
By storing them in a cool, dry place, you’ll have fresh pansy seedlings ready by early spring, ready to outshine anything at the nursery. The first time I saw my own heirloom pansies popping up in March, I knew I’d never buy them again.
Works for all pansy varieties, whether you’re growing in containers or garden beds. Here’s how to do it right the first time—no twists, no tears, just next year’s color explosion waiting in your pocket.
📚 In This Guide
- What you need
- Instructions
- Tips and common mistakes
- Wrapping up and next steps
What you need
- ● Mature pansy plants with fully developed seed pods (brown, papery, and slightly wrinkled). Aim for 3–5 healthy plants for a good yield.
- ○ Pruning shears or sharp scissors (sterilized with rubbing alcohol to prevent disease). Optional: A small hand pruner for thicker stems.
- ● Paper bags or breathable seed-saving envelopes (1–2 per plant). Pro tip: Label each bag with the pansy variety (e.g., "Cool Wave Purple") and the harvest date! 📝
- ○ Flat, dry surface (like a baking sheet or cardboard) for drying pods. Optional: A fan on low speed to speed up drying.
- ● Fine-mesh strainer or sifter (to separate seeds from chaff). A #20–30 mesh works best.
- ● Air-tight glass jars or seed storage containers (2–4 oz size). Must-have: Silica gel packets or a desiccant to keep moisture out!
- ● Permanent marker or labels (for jars and bags). Include variety, harvest year, and germination tips.
- ● Warm, dry conditions (70–80°F) for harvesting and drying pods. Avoid humidity—mold is the enemy! 🚫💦
- ● Indoor space with indirect sunlight for drying (e.g., a sunny windowsill or basement with good airflow).
- ● Patience! Seed pods take 2–4 weeks to fully dry before opening.
- ● Hand lens or magnifying glass (to inspect seeds for viability).
- ● Humidity pack (for long-term seed storage).
- ● Garden journal to track germination rates and notes on plant performance.
- ● Twist ties or rubber bands (to secure bags if pods are still attached to stems).
How to harvest pansy seed pods without the twist
Here’s the gentle, foolproof way to collect pansy seeds—no stubborn pods, no frustration.
🌱 Step 1: Wait for Pods to Mature Fully
Pansy seed pods ripen when they turn from green to a pale tan or light brown, and the outer shell feels dry and papery to the touch. Don’t rush—harvesting too early means immature seeds that won’t sprout. I wait until the pods split open naturally along one seam, revealing the tiny black seeds inside. This usually happens 4-6 weeks after the flowers fade.
Check pods daily in the late afternoon when humidity drops. The moment you see a seam crack open, that’s your cue to act quickly—pods dry out fast once exposed. If you miss the window, the seeds scatter, and you’ll have to start over. I keep a small mesh bag handy to catch any seeds that might pop loose before I’m ready.
🌿 Step 2: Gently Remove Pods Without Damaging Them
Use clean, sharp scissors or fingers to snip or pinch the stem just above the pod. Avoid pulling—this can tear the delicate casing and spill seeds prematurely. I like to twist the stem slightly while pulling upward to separate it cleanly. Place the pods in a paper bag (not plastic—it traps moisture and speeds up decay). Label the bag with the pansy variety and date.
Work on a dry day when pods are firm. If the weather’s humid, pods soften and split faster, making handling tricky. A small tray lined with newspaper under the plant catches any stray pods or seeds that drop during harvest. This is especially helpful if you’re harvesting multiple plants—it’s easy to miss a few.
💧 Step 3: Dry Pods Completely Before Handling
Spread the pods in a single layer on a paper towel or screen tray in a warm, dry place with indirect light (direct sun can scorch them). I use a seed-starting mat set to 70-75°F for faster drying. Turn pods every 12 hours to ensure even drying—this prevents mold from forming on one side. Complete drying takes 7-10 days, depending on humidity.
Pods are ready when they rattle when shaken—this means the seeds inside are loose and dry. If you press a pod and it crumbles easily, it’s overripe and may have lost viability. Store dried pods in an airtight container with a silica gel packet to absorb any remaining moisture. I keep mine in a cool, dark place until I’m ready to process.
✂️ Step 4: Extract Seeds and Store Properly
Once pods are bone-dry, gently crush them between your fingers or roll them on a clean surface to release the seeds. I use a fine-mesh sieve to separate seeds from chaff—just tap the sieve lightly and let the wind carry away the debris. Pansy seeds are tiny and black, so they’ll collect at the bottom. Count out 4-5 seeds per planting spot—they’re slow to germinate but worth the wait.
Store seeds in a small envelope labeled with the variety and harvest date. Keep them in the fridge (not the freezer) in a sealed container with a desiccant packet to prevent moisture buildup. Pansy seeds stay viable for 2-3 years if stored correctly. I like to test a few seeds every year to check germination rates—it’s a good reality check!
⏰ Step 5: Plant Seeds for Next Season
Sow pansy seeds 8-10 weeks before your last frost date in well-draining seed-starting mix at a depth of ⅛ inch. Keep the soil consistently moist (not soggy) and cover the tray with plastic wrap until germination, which takes 2-4 weeks in 60-65°F soil. Once seedlings emerge, remove the wrap and place them under grow lights for 14-16 hours daily—pansies need light to prevent leggy growth.
Transplant seedlings outdoors after the last frost when soil warms to 50°F and nighttime temps stay above 40°F. Pansies are cold-hardy but won’t tolerate frost as seedlings. I harden them off by placing them outside for 1 hour daily, gradually increasing time over 7-10 days. Mulch with 1 inch of straw to protect roots from temperature swings.
Tips & tricks for perfect pansy seed pod harvesting
Here's what nobody tells you about handling these delicate little pods—these tricks will save you from seed scattering and frustration.
Timing Secret: In Step 1, the 4-6 week window after flowers fade is crucial. I've learned to check pods every other day starting at week 3—this gives you the perfect balance between catching them at the right moment and avoiding the rush. The late afternoon timing is key because morning dew can make pods stickier and harder to handle. If you're harvesting multiple plants, prioritize the ones with pods that are already showing cracks.
Equipment Upgrade: For Step 2, I recommend using small, sharp kitchen scissors instead of fingers—it gives you more control and prevents accidental seed spills. Place a clean white plate or tray under each plant to catch any stray pods or seeds that might drop during harvesting. This is especially helpful if you're working with multiple plants at once. A small paintbrush can also help gently coax any seeds that stick to the plant back into your collection bag.
Drying Strategy: When drying pods in Step 3, I've found that placing them near a dehumidifier or in a room with good airflow can cut the 7-10 day drying time by about 3 days. The 70-75°F temperature is ideal—any hotter and you risk scorch marks, any cooler and mold becomes a risk. I like to place pods on a wire cooling rack over a baking sheet lined with paper towels to allow air circulation on all sides. This prevents moisture buildup underneath that can cause mold.
Seed Storage Wisdom: For Step 4, I've developed a simple test to check seed viability before storing. Place a few seeds between damp paper towels in a sealed container for 5 days. If they sprout, your batch is good to go. For long-term storage, I use small glass jars with tight-sealing lids instead of envelopes—they're easier to label and provide better protection from moisture. I also include a tiny piece of dry rice in each jar as a natural moisture absorber alongside the silica gel packet.
Pro Tips for Pansy Seed Pods
- Here's what nobody tells you about handling these delicate little pods—these tricks will save you from seed scattering and frustration.
- Timing Secret: In Step 1, the 4-6 week window after flowers fade is crucial.
- Equipment Upgrade: For Step 2, I recommend using small, sharp kitchen scissors instead of fingers—it gives you more control and prevents accidental seed spills.
Frequently asked questions
Got questions about harvesting and saving pansy seed pods? You’re not alone! Here’s a quick guide to the most common queries—because every gardener deserves a stress-free seed-saving experience.
When are pansy seed pods ready to harvest?
Harvest pansy seed pods when they turn dry and papery, usually 4–6 weeks after flowering. If they’re still green, they’re not ready—wait a few more days. Overripe pods may crack open, so act fast! Aim for late summer to early fall for best results.
How long do pansy seeds stay viable?
Freshly harvested pansy seeds stay viable for 1–2 years if stored properly in a cool, dry place (like a sealed envelope or jar). For best germination, use seeds within the first year. Pro tip: Label your pods with the harvest date to track freshness!
Can I collect seeds from store-bought pansy flowers?
Yes, but with a caveat! Store-bought pansies may be hybrids, meaning their seeds might not grow true to the parent plant. For consistent results, save seeds from heirloom or open-pollinated varieties instead. If you’re experimenting, just know the blooms could surprise you!
What do I do if my seed pods won’t open?
If pods stay closed, they might need a little help! Try gently squeezing the pod to release seeds or place them in a paper bag for a few days—the seeds will “rain” out naturally. Avoid forcing them open too early, or you’ll risk damaging the seeds inside.
Are there alternatives if I can’t save pansy seeds?
No problem! Buy fresh seeds from a trusted supplier or propagate pansies via leaf cuttings in early spring. For instant color, opt for pansy plugs from garden centers. Just remember: Seed-saving is rewarding but not mandatory for a beautiful garden!
Wrapping up and next steps
Harvesting pansy seed pods is a simple yet rewarding way to ensure your garden bursts with vibrant blooms next season!
By following the right steps—like choosing mature pods, using gentle techniques, and storing seeds properly—you’ll set yourself up for a thriving garden. Don’t let hesitation hold you back—your future floral displays are just a few seeds away!
Ready to take the next step? Start by marking your seed packets with the harvest date and variety, then plan your planting schedule for early spring. Happy gardening—your garden (and future pollinators 🐝) will thank you!