
Lawn
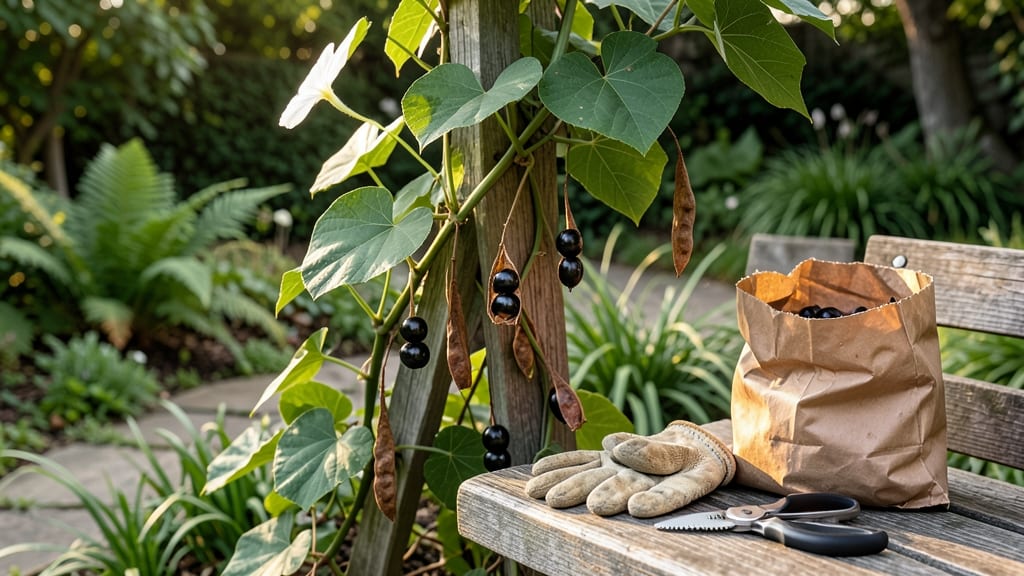
Moonflower seed pods hold the secret to next year’s midnight blooms—if you know when and how to harvest them. 🌙 I’ve learned the hard way that waiting too long means the pods split open and scatter seeds everywhere, while harvesting too early leaves you with immature seeds that won’t sprout.
The key is timing: collect those papery, pea-sized pods when they turn brown but before they crack open, usually in late summer or early fall after the vines have died back.
Once you’ve got the pods, the real magic happens inside. You’ll need a clean workspace and a pair of sharp scissors or your fingers—moonflower seeds are delicate but surprisingly easy to extract. Split open each pod and gently pry out the 2-4 seeds inside (yes, they’re tiny but sturdy).
A fine-mesh strainer helps separate the chaff from the good seeds, and a quick rinse removes any residual pod debris. Store them in a cool, dry place until planting season, but don’t wait too long—they lose viability after about a year.
Planting these seeds next spring gives you a second chance at those ethereal, moonlit blooms without buying new plants. The secret to germination is patience and warmth: press the seeds just below the soil surface in well-draining, slightly sandy loam (moonflowers hate soggy roots).
Within 10-14 days, you’ll see those first leaves pushing through, and by midsummer, you’ll be rewarded with vines that climb like crazy and flowers that open at dusk, filling your garden with a sweet, tropical scent.
Here’s the thing about moonflowers—once you’ve mastered the seed-saving routine, you’ll never buy them again. They’re annuals, so you’ll need to repeat the process each year, but the payoff is worth it: a garden that smells like moonlight and grows itself, year after year.
The only real mistake is not starting today.
📚 In This Guide
- What you need
- Instructions
- Tips and common mistakes
- Wrapping up and next steps
What you need
- ● Moonflower plants (Ipomoea alba) – Mature, healthy vines with seed pods (or fresh seeds from a trusted source).
- ● Pruning shears or sharp scissors – For harvesting pods without damaging the plant.
- ● Paper bags or breathable fabric sacks – 3–5 medium-sized bags (10x12 inches) to collect pods and allow airflow.
- ● Labeling tags and markers – To track seed pod maturity and harvest dates.
- ○ Gloves (optional but recommended) – To protect hands from thorns or rough stems.
- ● Small fan or well-ventilated space – For drying seed pods (a sunny windowsill works too!).
- ● Seed-starting trays or small pots – 2–4 shallow containers (4–6 inches deep) for germination.
- ● Potting mix – Lightweight, well-draining soil blend (e.g., 50% peat moss, 30% perlite, 20% coco coir).
- ● Spray bottle – For gentle moisture control during drying.
- ● Seed viability test kit – To check germination rates before planting.
- ● Grow lights or greenhouse – For extending the growing season in cooler climates.
- ● Trellis or stakes – If you plan to grow moonflowers again (6–10 feet tall!).
- ● Food-safe storage jars – For long-term seed preservation (airtight, labeled).
- ● Journal or notebook – To log pod maturity, harvest dates, and germination notes.
Step-by-step instructions for harvesting moonflower seed pods
Here’s how to rescue seeds from your moonflowers before they vanish—no waste, just future blooms.
🌿 Step 1: Identify and Locate Mature Seed Pods
Moonflower seed pods form after blooms wilt and drop, leaving behind those distinctive elongated, papery cases. Look for pods that are dry, brown, and slightly papery—they’ll feel light when you tap them. These are ready for harvest, while green or plump pods need more time. I check my plants every 2-3 days in late summer or early fall, as pods mature quickly after flowers fade.
Use a small pruning shears or your fingers to gently twist pods off the stem. Avoid pulling too hard—you’ll damage the vine. Place harvested pods in a paper bag (not plastic) to dry further. This prevents mold and mimics natural conditions. If pods open prematurely, cover them with a fine mesh bag to catch seeds.
🌱 Step 2: Dry and Extract Seeds
Spread the pods in a single layer on a tray or clean surface indoors, where they’ll dry completely in 5-7 days. Avoid direct sunlight—it can overheat and crack the pods. Once fully dry, they’ll crumble easily when squeezed. I like to place them near a sunny window but out of harsh rays, as moonflower seeds need gentle drying.
Crack open each pod over a sheet of paper or into a small bowl. Seeds will spill out as tiny, flat, dark brown discs. Sift through the debris to separate seeds from chaff. Store them in a paper envelope or small glass jar in a cool, dry place. Label with the harvest date—fresh seeds germinate best within 6 months of collection.
⏰ Step 3: Test Seed Viability Before Planting
Not all seeds will sprout, so test a few first. Fill a small container with moist potting mix and plant 3-4 seeds about ½ inch deep. Cover lightly with soil and mist gently. Place the container in a warm, sunny spot (70-75°F) and keep the soil evenly moist but not soggy. Check for sprouts in 7-14 days—moonflower seeds germinate slowly.
If none sprout after 2 weeks, your seeds may have lost viability. Try storing them in the fridge for another month before retesting. Successful germination means you’re ready to plant the rest outdoors in spring, after the last frost. I’ve had luck with seeds up to 2 years old, but fresh is always better.
🪴 Step 4: Plant Viable Seeds for Next Season
Direct-sow seeds ½ inch deep in well-draining soil after the last frost date in your area. Choose a spot with full sun (6+ hours daily) and rich, slightly sandy soil. Moonflowers thrive in USDA zones 9-11 but can be grown as annuals elsewhere. Space seeds 12-18 inches apart—they’ll sprawl quickly.
Water gently after planting and keep the soil consistently moist until germination. Once seedlings emerge, thin to the strongest 2-3 plants per location. Use a trellis or sturdy fence to support their vigorous vines. I plant mine near patios or pergolas—they’ll climb and create stunning evening displays.
Tips & tricks for perfect moonflower seed harvesting
These simple strategies will help you maximize your moonflower seed yield and ensure strong germination for next season.
Harvest Timing: Moonflower pods mature quickly after flowers fade, so check your plants every 2-3 days during late summer or early fall. The pods should be completely dry and brown—if they're still green or plump, give them more time. I've found that harvesting in the morning gives me the best results, as dew can help identify mature pods more easily.
Drying Strategy: When drying your pods indoors, place them in a single layer near a sunny window but out of direct sunlight. This gentle drying process (5-7 days) prevents overheating that could crack the pods. I like to prop a small fan nearby to create gentle airflow—this speeds up drying while preventing mold. Watch for the pods to become brittle and crumble easily when squeezed.
Seed Storage: Once you've extracted your seeds, store them in a paper envelope or small glass jar in a cool, dry place. Label each container with the harvest date, as fresh seeds (collected within 6 months) have the highest germination rates. I've had success storing seeds for up to 2 years in the fridge, but germination rates drop significantly after the first year. For best results, plant within 6 months of harvest.
Viability Test: Before planting all your seeds, test a few first by planting 3-4 seeds in a small container with moist potting mix. Place this in a warm, sunny spot (70-75°F) and keep the soil consistently moist. If none sprout after 2 weeks, try storing the remaining seeds in the fridge for another month before retesting. This simple test saves you from planting hundreds of seeds that might not germinate.
Pro Tips for Moonflower Seed Pods
- These simple strategies will help you maximize your moonflower seed yield and ensure strong germination for next season.
- Harvest Timing: Moonflower pods mature quickly after flowers fade, so check your plants every 2-3 days during late summer or early fall.
- Drying Strategy: When drying your pods indoors, place them in a single layer near a sunny window but out of direct sunlight.
Frequently asked questions
Got questions about harvesting, storing, or growing moonflower seed pods? You’re not alone! Here are some of the most common queries—plus straightforward answers to help you master zero-waste seed saving like a pro.
When are moonflower seed pods ready to harvest?
Harvest seed pods when they turn brown and begin splitting open naturally—usually 4–6 weeks after flowering. Wait until they’re fully dry but haven’t released seeds yet (morning harvests work best). If pods crack open too soon, collect seeds immediately to avoid scattering.
How do I know if the seeds inside are still viable?
Viable seeds are plump, firm, and dark brown/black. Test viability by placing a few in a glass of water: good seeds sink, while hollow or shriveled ones float. Store seeds in a cool, dry place (like a paper envelope) for up to 2 years—they’ll stay fresh for next season’s garden!
What if my moonflower pods mold or rot before I can harvest?
Mold or rot usually happens from excess moisture. To prevent it:
Yes! Store-bought seeds work, but home-harvested seeds often germinate faster and thrive better in your local climate. Moonflowers are annuals, so saving seeds ensures you’ll have fresh stock year after year. Pro tip: Label your pods to track varieties! For maximum longevity:
Common culprits:
If mold appears, salvage seeds by drying them separately in a single layer.
Can I grow moonflowers from store-bought seeds, or do I need to harvest my own?
What’s the best way to store moonflower seeds long-term?
Avoid the freezer—moonflower seeds don’t need cryogenic storage!
Why aren’t my moonflower seeds germinating?
Try soaking seeds in lukewarm water for 24 hours before planting to boost germination.
Wrapping up and next steps
Moonflower seed pods offer a zero-waste, rewarding way to grow these enchanting night-bloomers year after year! 🌙 With the right care—from harvesting ripe pods to storing seeds properly—you’ll unlock a self-sustaining garden that thrives on nature’s cycle.
Whether you’re a seasoned gardener or just starting, these secrets make propagation effortless and eco-friendly.
Ready to plant your future blooms? Grab those saved seeds, prep your soil, and watch your garden glow under the moonlight—all while reducing waste. 🌱 Start planting today!